Crispy Honey Chilli Potatoes- Easy Recipe
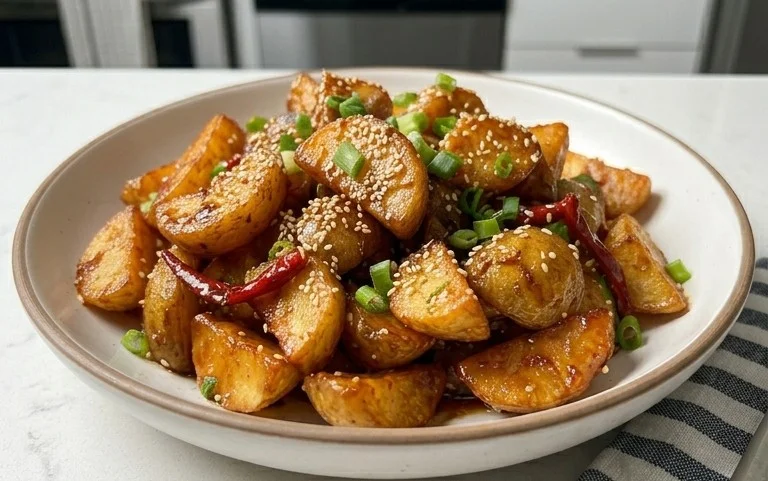
Crispy Honey Chilli Potatoes are an absolute game-changer in my kitchen, and I’m so excited to share this recipe with you! If you’re anything like me, you’re constantly on the hunt for that perfect snack or side dish that balances flavour and texture. Well, look no further. These potatoes deliver on every single front. What is it about them that makes them so irresistible? It’s that magical combination of sweet and spicy, a little bit sticky, and that incredibly satisfying crunch. They’re the kind of dish that disappears in minutes at any gathering, leaving everyone beggin extractg for more. The secret to truly outstanding Crispy Honey Chilli Potatoes lies in a few simple techniques that guarantee an amazing outcome every time. Get ready to fall in love!
Crispy Honey Chilli Potatoes
There are few things as satisfying as a perfectly crispy potato. And when you combine that irresistible crunch with a sweet and spicy glaze, you’ve got a snack or side dish that’s truly next level. These Crispy Honey Chilli Potatoes are just that – a delightful explosion of flavour and texture that’s surprisingly easy to make at home. Forget soggy fries and bland roasted potatoes; these little bites are addictive, moreish, and guaranteed to disappear in minutes. Whether you’re looking for a show-stopping appetizer for guests or a treat for yourself, this recipe delivers. I’ve perfected this method to ensure maximum crispiness and a beautifully balanced sweet and spicy coating. Let’s get started!
Ingredients:
Note 1: Cutting the Potatoes
For the best results, aim for consistent potato finger size. This ensures they cook evenly. You want pieces that are substantial enough to get a good crisp but not so thick that they remain soggy in the middle. Imagin extracte thick-cut fries or steak fries. If your potatoes are very large, you might need to cut them in half lengthwise before cutting them into fingers. Aim for uniform thickness of about 1/3 to 1/2 inch.
Note 2: Oil for Frying
You have a couple of options here. You can shallow fry or deep fry your potatoes. For shallow frying, you’ll need enough oil to come about halfway up the sides of your potato pieces. For deep frying, you’ll need enough to fully submerge them. A neutral oil with a high smoke point is best, such as vegetable oil, canola oil, or sunflower oil. About 2-3 cups of oil should suffice for shallow frying, and up to 6 cups for deep frying, depending on the size of your pot or pan.
Cooking Instructions:
1. Prepare the Potatoes: Begin extract by preparing your potatoes as per the ingredient list. Once cut, rinse the potato fingers under cold running water. This helps to remove excess starch, which can make them stick together and prevent them from getting as crispy. After rinsing, pat them thoroughly dry with paper towels. This is a crucial step for achieving that desired crispiness. Moisture is the enemy of crisp!
2. First Fry for Crispy Texture: Heat your chosen oil in a deep pan or wok over medium-high heat. You want the oil to be hot but not smoking. Carefully add the dried potato fingers to the hot oil in batches, ensuring not to overcrowd the pan. Overcrowding will lower the oil temperature and result in greasy, soggy potatoes. Fry them for about 5-7 minutes, until they are lightly golden and have started to soften, but are not yet fully cooked or browned. This initial fry is all about par-cooking them and starting to develop a crispy exterior. Remove the potatoes from the oil using a slotted spoon and place them on a wire rack set over a baking sheet to drain any excess oil. Allow them to cool for at least 10 minutes.
3. The Crispy Coating: While the potatoes are cooling, prepare the coating mixture. In a medium bowl, combine the ⅓ cup All Purpose Flour, ⅓ cup Corn Flour, and ¼ teaspoon Black Pepper. Whisk them together thoroughly. Now, take your par-fried potato fingers and add them to this dry coating mixture. Toss them gently until each potato finger is evenly coated. You can do this in batches if necessary to ensure even coverage. The corn flour in this mixture is key to achieving an extra-crispy finish.
4. Second Fry for Ultimate Crispiness: Once coated, heat your oil again over medium-high heat. This time, the oil needs to be hotter than the first fry. You can test if it’s ready by dropping a tiny piece of potato in; it should sizzle immediately. Carefully add the coated potato fingers back into the hot oil, again working in batches to avoid overcrowding. Fry them for another 3-5 minutes, or until they are deeply golden brown and incredibly crispy. You’ll notice them puffing up slightly. Once they reach your desired level of crispiness, remove them from the oil with a slotted spoon and place them back on the wire rack to drain. Season immediately with the 1 tablespoon of Salt while they are still hot.
5. Crafting the Honey Chilli Glaze: Now for the star of the show – the glaze! In a separate non-stick pan or wok, heat the 2 tablespoon of Oil over medium heat. Add the 1 tablespoon of finely chopped Garlic and sauté for about 30 seconds until fragrant, being careful not to burn it. Add the 2 teaspoon Chilli powder, 1 teaspoon Red Chilli Paste, and 1 teaspoon Red Chilli Flakes. Stir continuously for another 30 seconds to toast the spices and release their aromas. Pour in the ¼ cup Water and bring it to a gentle simmer. Stir in the 3 tablespoon Corn Flour and 3 tablespoon All Purpose Flour. Whisk vigorously to combine and ensure there are no lumps. Let this mixture thicken slightly, about 1-2 minutes. You’re looking for a sauce that’s starting to coat the back of a spoon.
6. The Sweet and Spicy Embrace: Once your glaze has thickened, it’s time to bring everything together. Add your wonderfully crispy, twice-fried potato fingers into the pan with the glaze. Gently toss them using a spatula or tongs until every single potato finger is beautifully coated in the glossy, sticky, sweet and spicy sauce. You want to coat them evenly without breaking their crispiness. Work quickly so the potatoes retain their crunch. Serve immediately to enjoy the maximum flavour and texture! These are best enjoyed fresh out of the pan.

Conclusion:
And there you have it – your guide to achieving the ultimate Crispy Honey Chilli Potatoes! This recipe is a true winner because it strikes that perfect balance between sweet, spicy, and undeniably satisfyingly crispy. The caramelized honey and the subtle kick of chilli create a flavour explosion that will have everyone reaching for more. They’re incredibly versatile, making them a fantastic starter, a side dish that elevates any meal, or even a delicious snack on their own. Don’t be afraid to experiment with the chilli level to suit your preference, or perhaps try adding a sprinkle of toasted sesame seeds or chopped spring onions for an extra layer of flavour and texture. I truly encourage you to give these delightful Crispy Honey Chilli Potatoes a go – I promise you won’t be disappointed!
Frequently Asked Questions:
Why are my honey chilli potatoes not crispy enough?
Ensuring your potatoes are thoroughly dry before frying is key. Pat them down with paper towels after cutting and before they go into the oil. Also, make sure your oil is hot enough (around 350°F or 175°C) and avoid overcrowding the pan, which can steam the potatoes instead of frying them to a crisp.
Can I make the honey chilli sauce ahead of time?
Yes, absolutely! The honey chilli sauce can be prepared a day or two in advance and stored in an airtight container in the refrigerator. Simply warm it gently before tossing it with your freshly fried potatoes to ensure they remain as crispy as possible.
What other vegetables can I make this with?
While potatoes are classic, you can adapt this recipe to other vegetables like sweet potatoes, cauliflower florets, or even chunks of firm tofu. Just adjust the cooking time as needed for each ingredient to achieve optimal crispiness.
Crispy Honey Chilli Potatoes
Deliciously crispy potatoes coated in a sweet and spicy honey chili glaze. Perfect as a snack or side dish.
Ingredients
-
4-5 Potatoes (450 grams, peeled and cut into fingers (1/3-1/2 inch thick, 2 -3 inches long))
-
Oil for brushing/deep frying
-
2 teaspoon Chilli powder
-
1 teaspoon Garlic Paste
-
1 teaspoon Red Chilli Paste
-
3 tablespoon Corn Flour
-
3 tablespoon All Purpose Flour
-
1 tablespoon Salt
-
⅓ cup All Purpose Flour
-
⅓ cup Corn Flour
-
¼ teaspoon Black Pepper
-
¼ cup Water
-
2 tablespoon Oil
-
1 tablespoon Garlic (finely chopped)
-
1 teaspoon Red Chilli Flakes
Instructions
-
Step 1
Wash and peel the potatoes. Cut them into finger shapes, approximately 1/3 to 1/2 inch thick and 2 to 3 inches long. Refer to Note 1 for details on cutting. -
Step 2
In a bowl, combine the cut potatoes with 3 tablespoons of corn flour, 3 tablespoons of all-purpose flour, 1 tablespoon of salt, 2 teaspoons of chilli powder, 1 teaspoon of garlic paste, and 1 teaspoon of red chilli paste. Toss well to ensure the potatoes are evenly coated. -
Step 3
Heat oil in a deep pan or wok for deep frying (refer to Note 2 for oil type and quantity). Once the oil is hot, carefully add the coated potatoes in batches and fry until golden brown and crispy. Remove and drain on paper towels. -
Step 4
In a separate bowl, whisk together 1/3 cup of all-purpose flour, 1/3 cup of corn flour, and 1/4 teaspoon of black pepper. Add 1/4 cup of water to create a thin batter and mix until smooth. -
Step 5
In a clean pan, heat 2 tablespoons of oil over medium heat. Add 1 tablespoon of finely chopped garlic and sauté until fragrant. Add 1 teaspoon of red chilli flakes and sauté for another 30 seconds. -
Step 6
Pour the flour and water batter into the pan with the garlic and chilli flakes. Stir continuously until the sauce thickens. Add honey (amount to taste for desired sweetness) and stir well. -
Step 7
Add the fried crispy potatoes to the thickened sauce and toss gently to coat them evenly. Serve immediately.
Important Information
Nutrition Facts (Per Serving)
It is important to consider this information as approximate and not to use it as definitive health advice.
Allergy Information
Please check ingredients for potential allergens and consult a health professional if in doubt.