Biscoff Cookie Butter Cheesecake Pops Recipe
Biscoff Cookie Butter Cheesecake Pops are more than just a delightful treat; they’re a miniature explosion of pure joy that captures the essence of two beloved indulgences in one irresistible bite. Imagin extracte the creamy, dreamy texture of cheesecake perfectly married with the warm, spiced, caramelized magic of Biscoff cookies, all encased in a portable, hand-held package. It’s no wonder these little wonders have taken the dessert world by storm! People are absolutely captivated by the harmonious blend of sweet and slightly spicy flavors that Biscoff brings, elevating the classic cheesecake experience to an entirely new level. What truly sets these Biscoff Cookie Butter Cheesecake Pops apart is their playful presentation and the intense, comforting aroma that wafts from them. They’re perfect for parties, a special afternoon pick-me-up, or simply when you crave something utterly spectacular. Get ready to discover how easy it is to create these crowd-pleasing gems in your own kitchen!
Ingredients:
- 8 oz cream cheese, softened
- ½ cup powdered sugar
- 1 teaspoon vanilla extract
- ½ cup whipped cream (or Cool Whip)
- ½ cup crushed Biscoff cookies
- ½ cup Biscoff cookie butter
- 2 tablespoons heavy cream (optional, for thinning)
- Whole Biscoff cookies
- Extra crushed Biscoff cookies for garnish
- Popsicle sticks
Biscoff Cookie Butter Cheesecake Pops Preparation
Step 1: Cream Cheese Base Creation
Begin extract by ensuring your 8 ounces of cream cheese is properly softened. This is a crucial step for achieving a smooth, lump-free cheesecake filling. You can leave it on the counter for about an hour at room temperature, or for a quicker method, carefully unwrap it and place it in a microwave-safe bowl, microwaving on 50% power for 15-second intervals until it’s pliable but not melted. In a medium-sized mixing bowl, add the softened cream cheese. Using an electric mixer, beat the cream cheese on medium speed until it’s completely smooth and creamy. This usually takes about 1-2 minutes. Gradually add in the ½ cup of powdered sugar, mixing on low speed initially to prevent a cloud of sugar from escaping, then increase to medium speed and beat until well combined and no sugar streaks remain. Scrape down the sides of the bowl as needed to ensure everything is incorporated. Next, mix in the 1 teaspoon of vanilla extract. The vanilla not only adds a wonderful aroma but also enhances the overall flavor profile of the cheesecake. Beat until just combined.
Step 2: Incorporating Whipped Cream and Cookie Crum extractbs
Once the cream cheese mixture is smooth and well-aerated, it’s time to lighten the texture with whipped cream. Gently fold in ½ cup of whipped cream (or your equivnon-alcoholic alent of Cool Whip). If you’re using real whipped cream, make sure it’s firm but not over-whipped. Folding is key here; you want to incorporate the air without deflating the whipped cream too much. Use a spatula and a gentle motigin extract bringing the cream cheese mixture up and over the whipped cream until just combined. Over-mixing can make the filling less airy. After the whipped cream is incorporated, add ½ cup of crushed Biscoff cookies. These crushed cookies will provide little pockets of delightful crunch and that signature Biscoff flavor throughout your cheesecake pops. Fold these in gently until evenly distributed.
Step 3: Infusing with Biscoff Cookie Butter Magic
Now comes the star ingredient that defines these pops: the Biscoff cookie butter. In a separate small bowl, gently warm the ½ cup of Biscoff cookie butter. You can do this by placing the jar in a bowl of warm water for a few minutes or by microwaving it for very short bursts (10-15 seconds), being careful not to overheat it, as this can affect its consistency. The goal is to make it pourable and smooth. If your cookie butter is already quite soft, you might be able to skip the warming step. If you find the Biscoff cookie butter is too thick to easily incorporate, you can add the optional 2 tablespoons of heavy cream to thin it out slightly. This will make it much easier to swirl into the cheesecake mixture. Gently pour the warmed or thinned Biscoff cookie butter into the cream cheese mixture. Using your spatula, carefully swirl the cookie butter into the batter. You don’t want to fully mix it in; aim for beautiful streaks and swirls that will create visual appeal and concentrated bursts of cookie butter flavor in every bite. Be patient with this step; the marbling effect is what makes these pops so special.
Step 4: Assembling the Popsicle Sticks and Freezing
Prepare your popsicle sticks by having them ready. Line a baking sheet or a flat tray with parchment paper or wax paper. This will prevent the cheesecake pops from sticking. Now, you’ll need to shape your cheesecake mixture. You can do this in a few ways. One method is to scoop rounded tablespoons of the mixture onto the prepared tray, leaving a little space between each one. Then, gently press a popsicle stick into the side of each scoop, pushing it about halfway in. Alternatively, you can carefully spoon the mixture into small, round silicone molds if you have them, pressing a popsicle stick into the center of each mold before filling. Once shaped and the popsicle sticks are inserted, place the tray in the freezer for at least 2-3 hours, or until firm. This freezing time is essential to ensure the pops hold their shape when you remove them from the tray and when you dip them later, if you choose to do so. Make sure they are frozen solid.
Step 5: Finishing Touches and Garnish
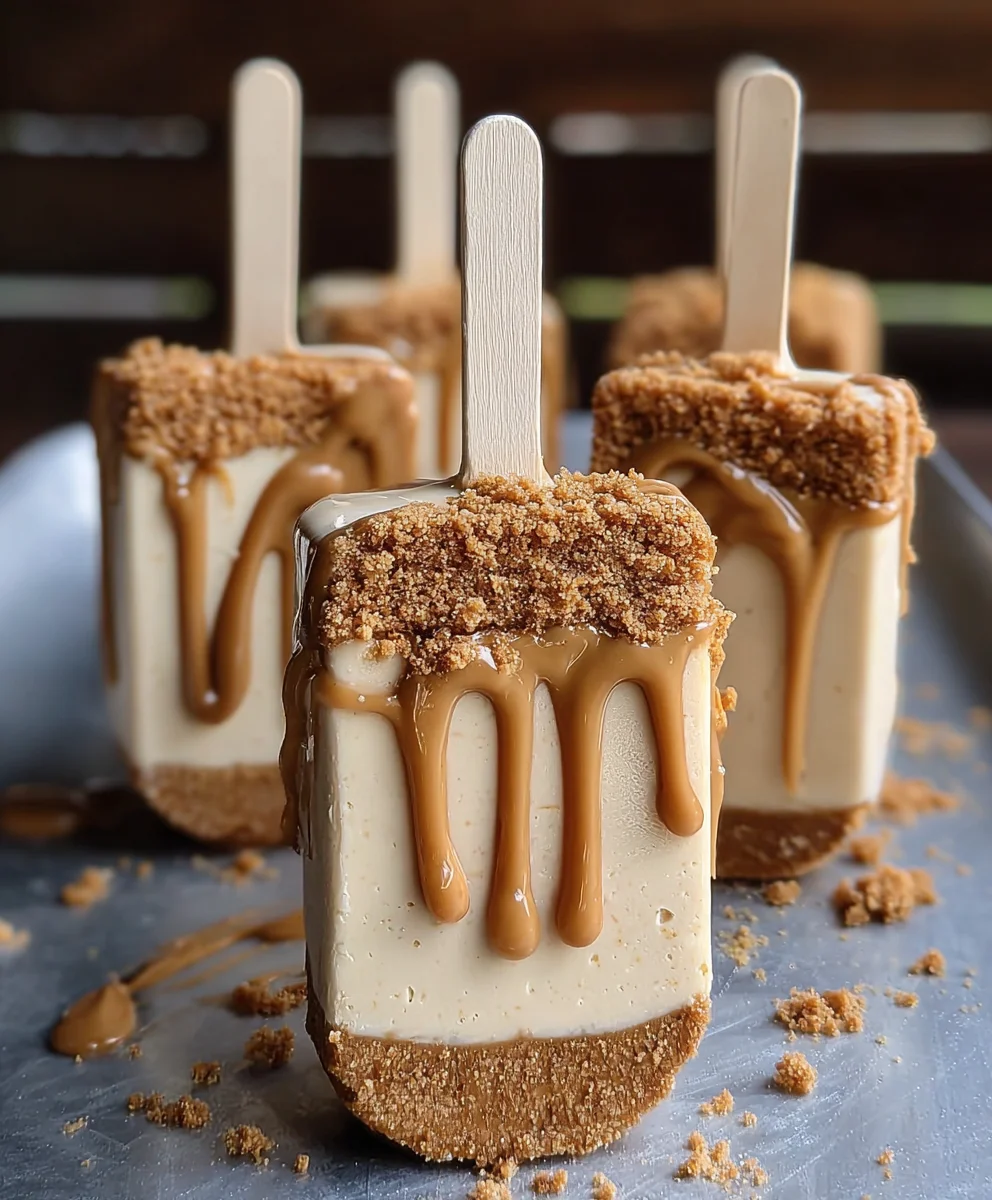
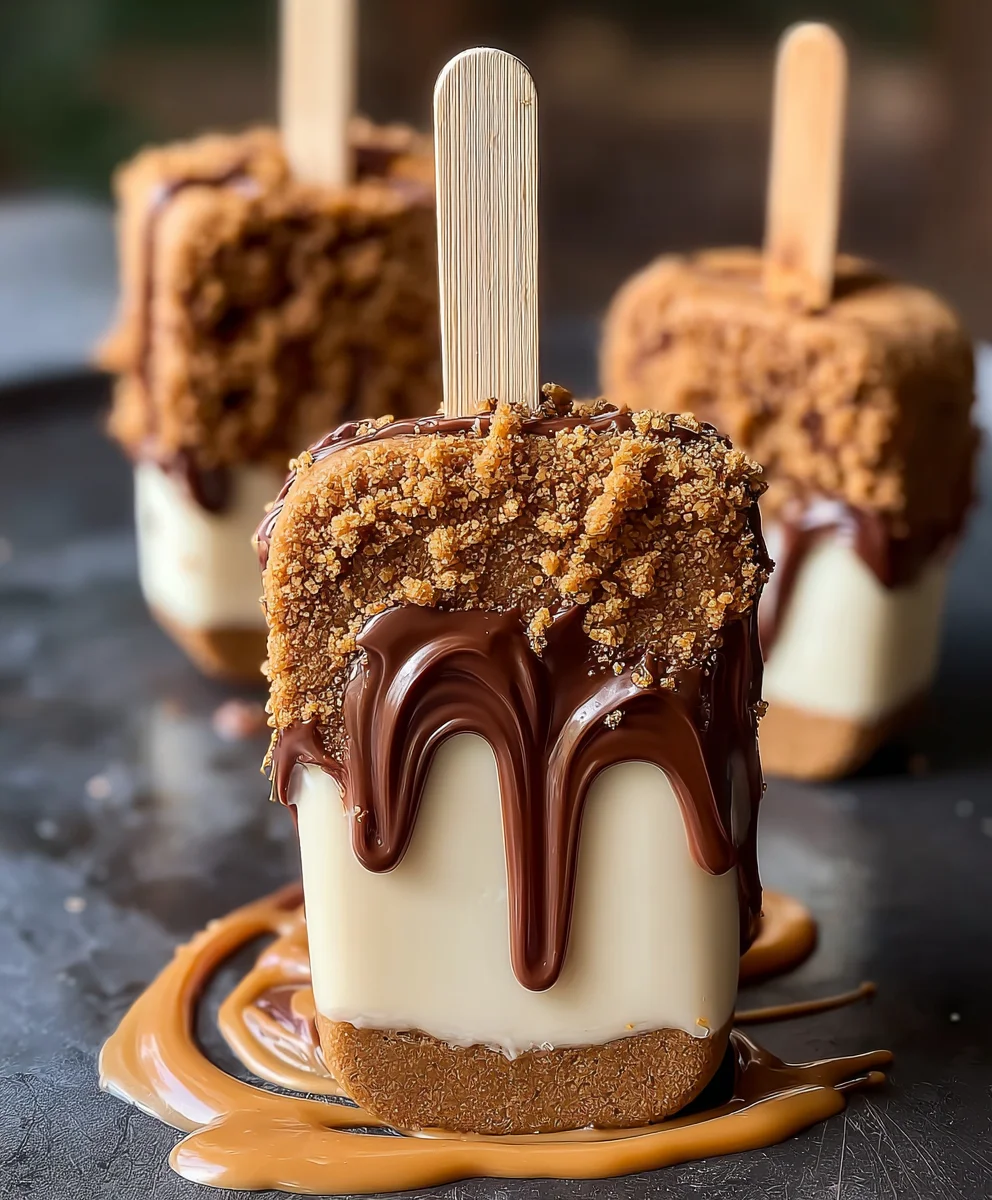
Once your cheesecake pops are firmly frozen, it’s time for the final delightful touches. Carefully remove the frozen cheesecake pops from the parchment paper or silicone molds. If you plan to dip them in a chocolate coating, this is when you would do it, but for these Biscoff-focused pops, we’ll keep it simple and showcase the Biscoff flavors. You can leave them as is, or for an extra flourish, you can press a whole Biscoff cookie onto the side of each pop before serving, or dip the tops into a small amount of melted chocolate and then immediately sprinkle with extra crushed Biscoff cookies. For a simpler garnish, just roll the sides of the frozen pops in the extra crushed Biscoff cookies, pressing gently to adhere. The crushed cookies will add another layer of texture and intensify the Biscoff experience. Serve immediately or keep them frozen until ready to enjoy. These Biscoff Cookie Butter Cheesecake Pops are a perfect no-bake treat for any occasion.
Conclusion:
There you have it – the ultimate guide to creating delightful Biscoff Cookie Butter Cheesecake Pops! We’ve walked through each step, from the creamy cheesecake base infused with that irresistible Biscoff flavor to the perfect coating that seals in all the goodness. These pops are a fantastic treat for any occasion, whether it’s a party, a thoughtful gift, or simply a well-deserved indulgence for yourself. Their portable nature makes them perfect for sharing, and the unique combination of smooth cheesecake and spiced cookie butter is sure to impress.
For serving suggestions, consider presenting your Biscoff Cookie Butter Cheesecake Pops on a decorative platter, perhaps with a dusting of crushed Biscoff cookies or a drizzle of melted chocolate. They are wonderful on their own but also pair beautifully with coffee or a glass of milk.
Don’t be afraid to get creative with variations! You can experiment with different toppings like white chocolate, dark chocolate, or even a caramel drizzle. For an extra layer of texture, try rolling some pops in chopped nuts or shredded coconut before the chocolate sets. The possibilities are truly endless.
We encourage you to try making these Biscoff Cookie Butter Cheesecake Pops. They might seem a little intimidating at first, but with a little patience and following these instructions, you’ll be rewarded with a truly special dessert. Enjoy the process and savor every delicious bite!
FAQs:
How should I store Biscoff Cookie Butter Cheesecake Pops?
It’s best to store your Biscoff Cookie Butter Cheesecake Pops in an airtight container in the refrigerator. They will keep well for up to 3-4 days. If you plan to store them for longer, you can also freeze them. Place them on a baking sheet lined with parchment paper until firm, then transfer to a freezer-safe bag or container. Thaw them in the refrigerator before enjoying.
Can I make the cheesecake mixture ahead of time?
Yes, absolutely! You can prepare the Biscoff Cookie Butter Cheesecake Pops mixture up to a day in advance. Once it’s mixed and chilled until firm enough to scoop, you can proceed with shaping and coating them whenever you’re ready. Keeping the mixture chilled is key for easier handling and shaping.
Biscoff Cookie Butter Cheesecake Pops
Delicious no-bake cheesecake pops featuring the irresistible flavor of Biscoff cookie butter and cookies.
Ingredients
-
8 oz cream cheese, softened
-
½ cup powdered sugar
-
1 teaspoon vanilla extract
-
½ cup whipped cream (or Cool Whip)
-
½ cup crushed Biscoff cookies
-
½ cup Biscoff cookie butter
-
2 tablespoons heavy cream (optional, for thinning)
-
Whole Biscoff cookies
-
Extra crushed Biscoff cookies for garnish
-
Popsicle sticks
Instructions
-
Step 1
Beat softened cream cheese until smooth. Gradually add powdered sugar and vanilla extract, beating until well combined. -
Step 2
Gently fold in whipped cream until just combined. Then, fold in crushed Biscoff cookies until evenly distributed. -
Step 3
Gently warm Biscoff cookie butter (or thin with heavy cream if needed). Swirl the cookie butter into the cream cheese mixture, creating streaks and swirls. -
Step 4
Scoop rounded tablespoons of the mixture onto a parchment-lined baking sheet. Press a popsicle stick halfway into each scoop. Freeze for at least 2-3 hours until firm. -
Step 5
Carefully remove frozen pops from the parchment. Garnish by pressing a whole Biscoff cookie onto the side, or roll the sides in extra crushed Biscoff cookies.
Important Information
Nutrition Facts (Per Serving)
It is important to consider this information as approximate and not to use it as definitive health advice.
Allergy Information
Please check ingredients for potential allergens and consult a health professional if in doubt.