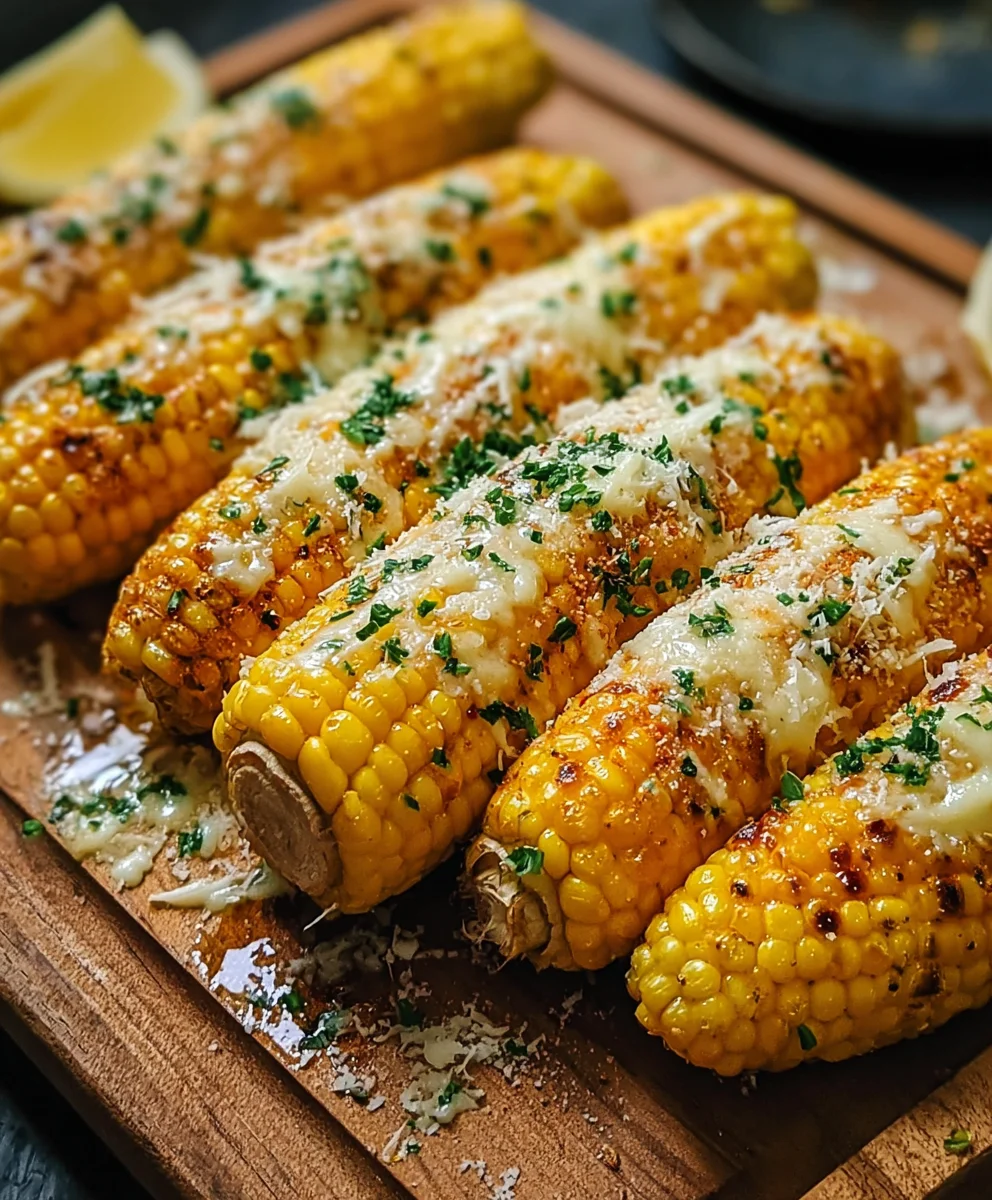
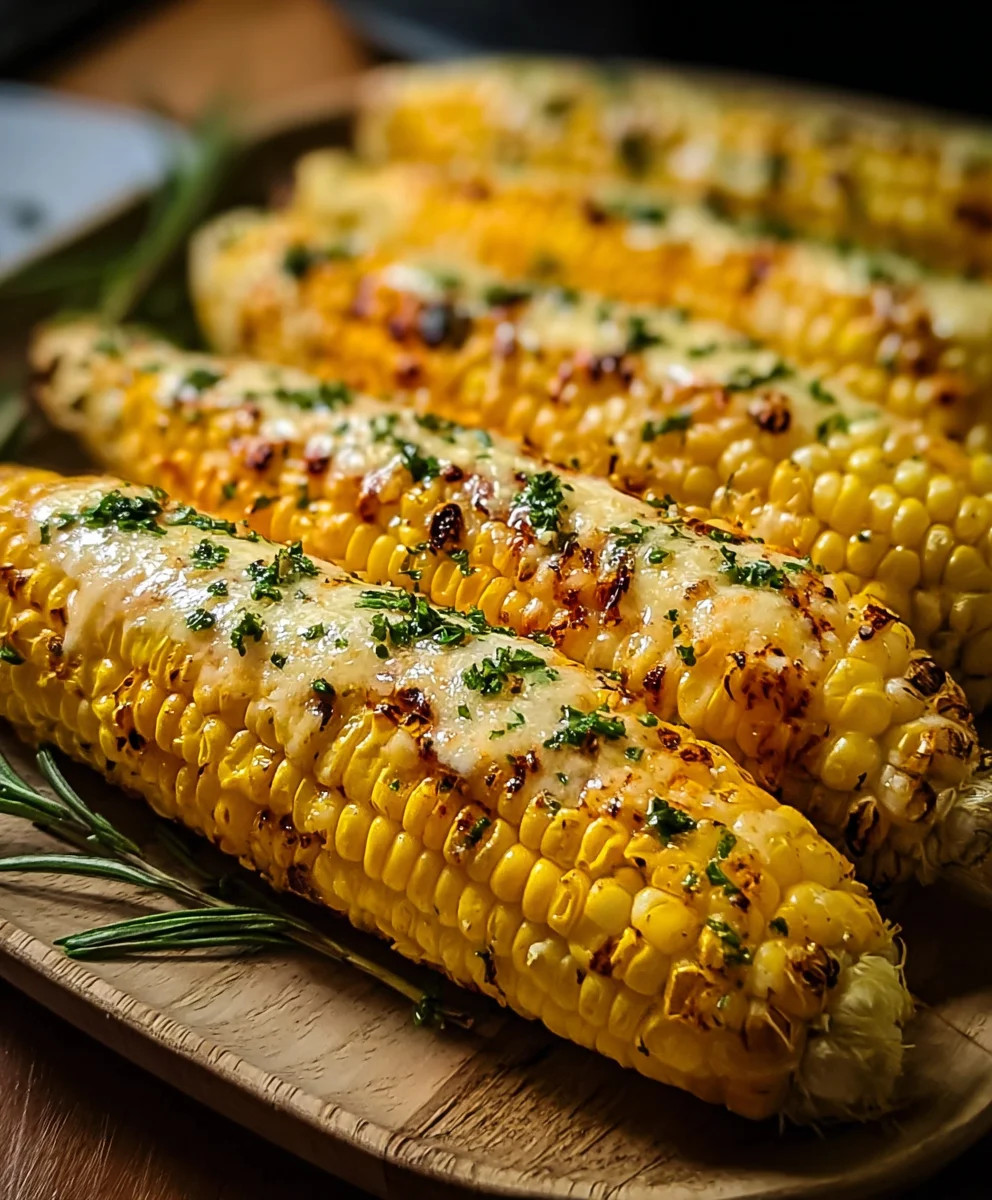
Cheesy Garlic Butter Corn on the Cob – Easy Recipe
Cheesy Garlic Butter Corn on the Cob is the ultimate summer side dish, a flavor explosion that instantly transports you to backyard barbecues and sun-drenched picnics. There’s something undeniably magical about perfectly cooked corn, and when you elevate it with a decadent blend of rich butter, pungent garlic, and gooey cheese, you create pure edible bliss. It’s no wonder this dish has become a crowd-pleaser, eliciting happy sighs and demands for seconds with every bite. What truly sets this Cheesy Garlic Butter Corn on the Cob apart is the harmonious marriage of textures and tastes: the sweet, tender kernels bursting with flavor, the savory umami from the garlic and cheese, and the lusciousness of the butter creating a mouthwatering experience that’s both comforting and utterly craveable.
The Irresistible Charm of Cheesy Garlic Butter Corn on the Cob
This isn’t just corn; it’s an experience. The simple act of slathering grilled or boiled corn with this incredible topping transforms it from a humble vegetable into a star attraction. Imagin extracte the aroma filling your kitchen as the garlic infuses the butter, and then the satisfying stretch of melted chegin extract clinging to each juicy kernel. It’s a dish that appeals to all ages and is perfect for any occasion, from casual family dinners to more festive gatherings. The beauty of Cheesy Garlic Butter Corn on the Cob lies in its simplicity, yet its flavor profile is anything but basic.
Why You’ll Fall in Love
People adore this dish because it taps into our collective love for comforting, flavorful, and visually appealing food. The vibrant yellow of the corn, contrasted with the golden brown of the melted cheese and the specks of green herbs, makes for a stunning presentation. Plus, the interactive nature of eating corn on the cob adds an element of fun. It’s a dish that sparks joy and creates lasting memories, all while being incredibly easy to prepare. Get ready to impress your guests and yourself with this sensational recipe.
Ingredients:
- 4 ears fresh corn, husked
- ¼ cup (½ stick) unsalted butter, softened
- 2 garlic cloves, minced
- 1 tbsp chopped fresh parsley
- ½ tsp salt
- ¼ tsp black pepper
- ½ cup grated Parmesan cheese
- 1 tsp lemon zest (optional)
Preparing the Corn
Preheating and Corn Prep
To begin extract making our delicious Cheesy Garlic Butter Corn on the Cob, the first thing we need to do is get our oven ready and prepare the corn itself. Preheat your oven to 400°F (200°C). This consistent, medium-high heat is perfect for roasting the corn, allowing the kernels to become tender and slightly caramelized while the cheesy butter mixture melts beautifully over them. While the oven is heating up, take your four ears of fresh corn and carefully remove all of the husks and silk. You want to get as much of the silk off as possible to ensure a clean eating experience. Some people prefer to rinse the corn under cool water at this stage, but it’s not strictly necessary. Pat the corn dry with a paper towel; this helps the butter mixture adhere better.
Making the Garlic Butter Mixture
Combining Flavorful Elements
Now it’s time to create the heart of our Cheesy Garlic Butter Corn on the Cob: the incredibly flavorful garlic butter. In a medium bowl, combine the softened unsalted butter. Make sure your butter is truly softened and not melted; this will make it much easier to mix and spread evenly. To the butter, add the two cloves of minced garlic. Mincing the garlic finely releases its pungent aroma and flavor, which will infuse the butter beautifully. Next, stir in one tablespoon of chopped fresh parsley. Fresh parsley adds a bright, herbaceous note that complements the richness of the butter and garlic wonderfully. For seasoning, add half a teaspoon of salt and a quarter teaspoon of black pepper. These basic seasonings are essential for enhancing all the other flavors in the dish. If you’re using the optional lemon zest, now is the time to add that teaspoon of lemon zest. It provides a subtle, zesty lift that cuts through the richness and adds an extra layer of complexity to the overall taste profile. Mix all these ingredients together thoroughly until you have a smooth, homogenous garlic butter mixture. It should be creamy and well combined, ready to coat our corn.
Assembling and Roasting
Coating the Corn
With our garlic butter mixture ready, we can now assemble our Cheesy Garlic Butter Corn on the Cob. Take each ear of corn and generously spread the garlic butter mixture all over it, ensuring an even coating on all sides. Don’t be shy with the butter; this is what makes the corn so incredibly delicious and succulent. Get into all the nooks and crannies between the kernels. Once each ear of corn is coated with the garlic butter, place them on a baking sheet. You can line the baking sheet with parchment paper or aluminum foil for easier cleanup, although it’s not strictly required. Arrange the corn ears so they are not touching each other, allowing for even heat circulation. This ensures that each ear roasts and bakes uniformly.
The Cheesy Transformation
Now for the cheesy part that elevates this corn to legendary status. After you’ve spread the garlic butter over the corn, it’s time to add the star topping: the grated Parmesan cheese. Sprinkle the half cup of grated Parmesan cheese evenly over the buttered corn. Gently press the cheese down so it adheres to the butter. The Parmesan will melt and crisp up slightly during baking, creating a delightful cheesy crust that is both savory and slightly nutty. Place the baking sheet with the prepared corn into your preheated oven.
Roasting to Perfection
Roast the corn for 20 to 25 minutes. During this time, you’ll want to keep an eye on it. The exact roasting time can vary depending on your oven and the thickness of the corn. You’re looking for the kernels to be tender when pierced with a fork, and the Parmesan cheese to be melted and lightly golden brown. If you notice any spots browning too quickly, you can carefully rotate the baking sheet. For an even more golden and slightly crisped topping, you can turn on your oven’s broiler for the last 1-2 minutes of cooking, but be extremely watchful as it can burn very quickly under the broiler.
Serving Your Masterpiece
Final Touches and Enjoyment
Once the corn has finished roasting and looks golden and delicious, carefully remove the baking sheet from the oven. Let the Cheesy Garlic Butter Corn on the Cob cool for just a few minutes before serving, as it will be very hot. The melted butter and cheese will be molten and delightful. You can garnish with a little extra chopped fresh parsley for a pop of color and freshness, if desired. Serve immediately and enjoy the incredible flavor explosion of tender corn, rich garlic butter, and savory melted Parmesan cheese. This dish is perfect as a side for any meal, or even as a delightful appetizer on its own.
Conclusion:
You’ve just unlocked the secret to the most irresistible Cheesy Garlic Butter Corn on the Cob! This recipe is a guaranteed crowd-pleaser, perfect for barbecues, family dinners, or simply when you’re craving a taste of pure comfort. The combination of sweet corn, pungent garlic, creamy butter, and savory cheese is truly magical. Don’t be afraid to experiment and make it your own!
For serving suggestions, this corn is a fantastic side dish for grilled meats like chicken or steak, burgers, or even alongside a hearty pasta dish. It also holds its own as a vegetarian main when paired with a fresh salad. Feel free to sprinkle with fresh chopped parsley or chives for an extra pop of color and flavor. When it comes to variations, consider adding a pinch of smoked paprika for a smoky kick, or a dash of chili powder for a touch of heat. You could even mix in some crum extractbled beef bacon for an extra layer of indulgence!
We truly hope you enjoy making and devouring this delightful Cheesy Garlic Butter Corn on the Cob. It’s simple, satisfying, and incredibly delicious. Go forth and corn with confidence!
Frequently Asked Questions:
Can I make this Cheesy Garlic Butter Corn on the Cob ahead of time?
While it’s best enjoyed fresh off the grill or out of the oven, you can prepare the garlic butter mixture and have your corn shucked and ready in advance. This will save you time when you’re ready to cook. The final assembly and cooking should be done just before serving for optimal texture and flavor.
What if I don’t have fresh corn? Can I use frozen corn?
Yes, you absolutely can! If using frozen corn, you’ll want to thaw it completely and pat it dry before mixing it with the garlic butter and cheese. You can then spread it on a baking sheet and bake until heated through and the cheese is melted and bubbly. The texture might be slightly softer than fresh corn on the cob, but it will still be incredibly delicious.
Cheesy Garlic Butter Corn on the Cob – Easy Recipe
An easy and delicious recipe for Cheesy Garlic Butter Corn on the Cob, perfect as a side dish or appetizer.
Ingredients
-
4 ears fresh corn, husked
-
1/4 cup unsalted butter, softened
-
2 garlic cloves, minced
-
1 tbsp chopped fresh parsley
-
1/2 tsp salt
-
1/4 tsp black pepper
-
1/2 cup grated Parmesan cheese
-
1 tsp lemon zest (optional)
Instructions
-
Step 1
Preheat your oven to 400°F (200°C). Husk and remove silk from the corn, then pat dry. -
Step 2
In a medium bowl, combine softened butter, minced garlic, chopped parsley, salt, pepper, and optional lemon zest. Mix until smooth. -
Step 3
Generously spread the garlic butter mixture evenly over each ear of corn. -
Step 4
Place the buttered corn on a baking sheet and sprinkle evenly with grated Parmesan cheese, pressing gently to adhere. -
Step 5
Roast for 20-25 minutes, or until kernels are tender and Parmesan is melted and lightly golden brown. -
Step 6
For a crispier topping, broil for the last 1-2 minutes, watching carefully to prevent burning. Let cool slightly before serving.
Important Information
Nutrition Facts (Per Serving)
It is important to consider this information as approximate and not to use it as definitive health advice.
Allergy Information
Please check ingredients for potential allergens and consult a health professional if in doubt.