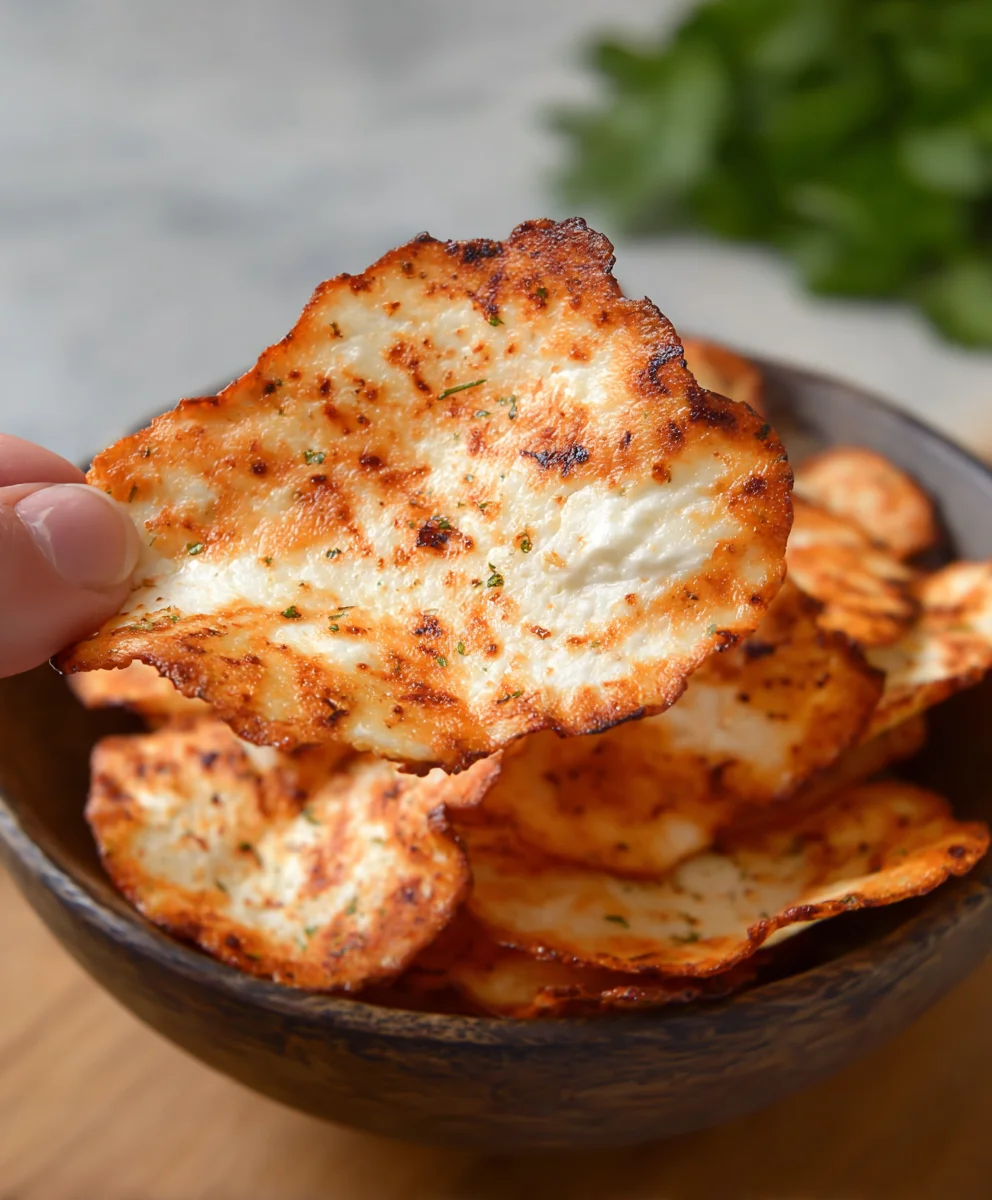
Crispy Cottage Cheese Chips- Healthy Keto Snack
Cottage Cheese Chips are more than just a trendy snack; they’re a revelation for anyone seeking a healthier, more satisfying crunch. Forget those store-bought options loaded with questionable ingredients and sky-high sodium. We’re talking about a homemade marvel that’s unbelievably simple, incredibly versatile, and surprisingly delicious. Imagin extracte biting into a perfectly baked chip, crispy and golden, with a subtle tang that’s utterly addictive. This is the magic of homemade Cottage Cheese Chips. People adore them not just for their satisfying texture and savory flavor, but because they’re a fantastic way to get a good dose of protein into your day without the guilt. What truly sets these Cottage Cheese Chips apart is their inherent adaptability. Whether you’re craving a cheesy indulgence, a spicy kick, or a herbaceous delight, the base recipe is your canvas, ready to be transformed into your personal flavor masterpiece.

Ingredients:
- 2 cups (about 16 ounces) full-fat cottage cheese
- 2 large eggs
- 1/2 cup grated Parmesan cheese
- 1/4 cup all-purpose flour (or almond flour for a gluten-free option)
- 1 teaspoon dried Italian seasoning
- 1/2 teaspoon garlic powder
- 1/4 teaspoon onion powder
- 1/4 teaspoon black pepper
- Pinch of salt (optional, as Parmesan is salty)
- Optional: 1/4 cup finely chopped fresh chives or parsley for garnish
Preparing the Cottage Cheese Base
Step 1: Preheating the Oven and Preparing the Baking Sheets
Before we even think about mixing ingredients, it’s crucial to get your oven preheated and your baking sheets ready. This ensures a smooth transition from mixing to baking, leading to evenly cooked cottage cheese chips. Preheat your oven to 375°F (190°C). Line two large baking sheets with parchment paper. Parchment paper is your best friend here, as it prevents sticking and makes cleanup a breeze. If you don’t have parchment paper, you can lightly grease the baking sheets, but parchment is highly recommended for the best results. Make sure the parchment paper lies flat on the baking sheets; wrinkles can sometimes transfer to your chips.
Step 2: Blending the Cottage Cheese Mixture
This is where the magic begin extracts. In a medium-sized bowl, combine the full-fat cottage cheese and the two large eggs. Using an immersion blender or a regular blender, process the cottage cheese and eggs until the mixture is completely smooth and creamy. You want to eliminate any lumps from the cottage cheese. If you don’t have an immersion blender, you can transfer the cottage cheese and eggs to a regular blender and blend until perfectly smooth. This smooth base is essential for achieving a chip-like texture rather than a curdled one. Take your time with this step; the smoother the base, the better your final cottage cheese chips will be.
Step 3: Incorporating the Dry Ingredients
Once your cottage cheese and egg mixture is beautifully smooth, it’s time to add the dry ingredients. To the blended mixture, add the grated Parmesan cheese, all-purpose flour (or almond flour if you’re opting for a gluten-free version), dried Italian seasoning, garlic powder, onion powder, black pepper, and a pinch of salt if you desire. Stir everything together thoroughly with a spatula or a wooden spoon until just combined. Be careful not to overmix at this stage. Overmixing can develop the gluten in the flour too much, which might result in tougher chips. You’re aiming for a cohesive batter that holds together well. If you’re adding fresh herbs like chives or parsley, stir them in gently at this point.
Shaping and Baking the Chips
Step 4: Scooping and Spreading the Batter
Now it’s time to form our cottage cheese chips. Drop rounded tablespoons of the batter onto the prepared baking sheets. Leave about 2 inches of space between each dollop of batter. This is important because the chips will spread slightly as they bake. Once you have your dollops, use the back of a spoon or a small offset spatula to gently spread each mound into a thin, round shape, roughly 3-4 inches in diameter. The thinner you spread the batter, the crispier your cottage cheese chips will be. Aim for an even thickness across each chip to ensure they bake uniformly. Don’t worry if they aren’t perfectly round; rustic is charming!
Step 5: Baking and Cooling the Cottage Cheese Chips
Place the prepared baking sheets into your preheated oven. Bake for 20-25 minutes, or until the edges of the cottage cheese chips are golden brown and crisp. The exact baking time will depend on your oven and the thickness of your chips. Keep an eye on them, especially during the last few minutes of baking, to prevent burning. Once baked to your desired crispness, carefully remove the baking sheets from the oven. Let the cottage cheese chips cool on the baking sheets for about 5-10 minutes. They will continue to crisp up as they cool. After they have cooled slightly and are firm enough to handle, gently transfer them to a wire rack to cool completely. This allows air to circulate around them, ensuring they achieve maximum crispness. Once completely cool, they are ready to be enjoyed! Store any leftovers in an airtight container at room temperature for up to 3 days.
Conclusion:
We hope you’ve enjoyed learning how to make these incredibly simple and satisfying Cottage Cheese Chips! This recipe is a fantastic way to enjoy a guilt-free snack that’s packed with protein and surprisingly delicious. The crispy texture and savory flavor make them a perfect alternative to traditional chips. They’re so versatile, and we encourage you to get creative with your seasonings! Whether you’re looking for a healthy breakfast addition, a light lunch component, or a satisfying evening treat, these Cottage Cheese Chips are sure to become a staple in your kitchen.
For serving, these chips are wonderful on their own, but they also pair beautifully with a side of salsa, guacamole, or your favorite healthy dip. You can even crum extractble them over salads for added crunch and protein. When it comes to variations, the possibilities are endless! Try adding smoked paprika for a smoky kick, garlic powder and onion powder for an “everything bagel” vibe, or even a touch of chili powder and cumin for a Mexican-inspired flavor. Don’t be afraid to experiment – that’s where the real fun lies!
Frequently Asked Questions:
What is the best way to store Cottage Cheese Chips?
Once completely cooled, store your Cottage Cheese Chips in an airtight container at room temperature for up to 3-4 days. For maximum crispiness, it’s best to consume them within the first couple of days.
Can I make Cottage Cheese Chips dairy-free?
Unfortunately, this recipe relies on traditional dairy-based cottage cheese for its structure and protein content. While there are dairy-free cottage cheese alternatives available, they may not yield the same crispy results as this specific recipe.
Crispy Cottage Cheese Chips – Healthy Keto Snack
A simple and healthy recipe for crispy cottage cheese chips, perfect for a keto-friendly snack.
Ingredients
-
2 cups (about 16 ounces) full-fat cottage cheese
-
2 large eggs
-
1/2 cup grated Parmesan cheese
-
1/4 cup all-purpose flour
-
1 teaspoon dried Italian seasoning
-
1/2 teaspoon garlic powder
-
1/4 teaspoon onion powder
-
1/4 teaspoon black pepper
-
Pinch of salt (optional)
-
1/4 cup finely chopped fresh chives or parsley (optional)
Instructions
-
Step 1
Preheat your oven to 375°F (190°C). Line two large baking sheets with parchment paper. -
Step 2
In a medium-sized bowl, combine the full-fat cottage cheese and the two large eggs. Using an immersion blender or a regular blender, process until the mixture is completely smooth and creamy. -
Step 3
To the blended mixture, add the grated Parmesan cheese, all-purpose flour, dried Italian seasoning, garlic powder, onion powder, black pepper, and salt if desired. Stir everything together thoroughly with a spatula or wooden spoon until just combined. -
Step 4
Drop rounded tablespoons of the batter onto the prepared baking sheets, leaving about 2 inches of space between each dollop. Gently spread each mound into a thin, round shape, roughly 3-4 inches in diameter. -
Step 5
Bake for 20-25 minutes, or until the edges are golden brown and crisp. Keep an eye on them to prevent burning. -
Step 6
Let the chips cool on the baking sheets for 5-10 minutes, then transfer them to a wire rack to cool completely. Store in an airtight container at room temperature for up to 3 days.
Important Information
Nutrition Facts (Per Serving)
It is important to consider this information as approximate and not to use it as definitive health advice.
Allergy Information
Please check ingredients for potential allergens and consult a health professional if in doubt.