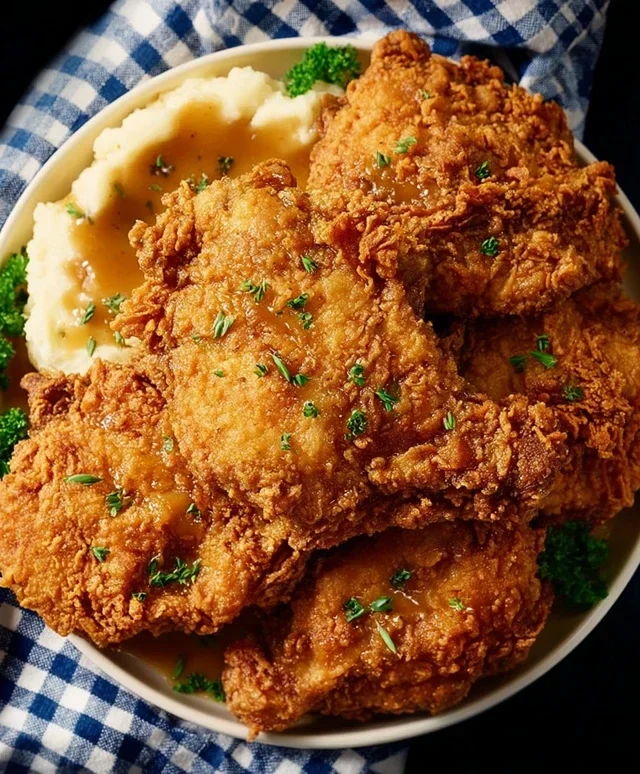
Crispy Country Fried Chicken Recipe-Southern Comfort Food
Country fried chicken is more than just a meal; it’s a warm hug on a plate, a taste of home that transports you back to simpler times. There’s something inherently comforting and deeply satisfying about biting into a piece of perfectly executed country fried chicken. The crispy, golden-brown crust, seasoned to perfection, gives way to incredibly juicy, tender chicken within. It’s a dish that evokes memories of family gatherings, Sunday dinners, and the unmistakable aroma filling a bustling kitchen. What makes this particular rendition of country fried chicken so special is the careful balance of flavors and the magic that happens when simple, honest ingredients come together. We’re talking about that irresistible crunch, the savory seasoned flour coating, and that melt-in-your-mouth tenderness that truly defines what country fried chicken should be.
Country Fried Chicken
There’s something undeniably comforting about a plate piled high with golden-brown, crispy country fried chicken. It’s a dish that evokes warm memories of family dinners and Southern hospitality. While it might seem daunting, achieving that perfect crunch and juicy interior is absolutely within reach. My approach to country fried chicken focuses on simple, quality ingredients and a technique that ensures maximum flavor and texture. We’re going to take boneless, skinless chicken breasts and transform them into a restaurant-worthy treat right in your own kitchen. The key lies in a well-seasoned dredge and the right cooking temperature. Let’s get started!
Ingredients:
Cooking Instructions:
1. Prepare the Chicken: The first step is to get our chicken ready. Take your 4 boneless, skinless chicken breasts and lay them on a clean cutting board. For more even cooking and a better crust-to-meat ratio, I like to pound them slightly. You can do this by placing a piece of plastic wrap over the chicken and gently hitting it with the flat side of a meat mallet or even a heavy rolling pin until they are about ½ inch thick. This ensures that the chicken cooks through without the exterior burning. Don’t worry if they aren’t perfectly uniform; some variation is fine. Once pounded, cut each breast into roughly 2-3 pieces, depending on their origin extractal size, to create manageable serving portions.
2. The Buttermilk Bath: Now comes the crucial part of tenderizing and seasoning. In a medium bowl, pour in your 2 cups of buttermilk. To this, add 1 teaspoon of the regular salt, ½ teaspoon of the black pepper, and the ½ teaspoon of cayenne pepper. Whisk these ingredients together until well combined. Place your prepared chicken pieces into the buttermilk mixture, ensuring each piece is fully submerged. Cover the bowl and let it marinate in the refrigerator for at least 30 minutes, or ideally for 2-4 hours. This buttermilk brine works wonders, not only seasoning the chicken deeply but also breaking down the proteins, making it incredibly tender and moist. If you don’t have buttermilk, you can create a substitute by adding 2 tablespoons of white vinegar or lemon juice to a measuring cup, then filling the rest of the way with milk and letting it sit for 5-10 minutes until it curdles slightly.
3. Crafting the Crispy Coating: While the chicken is marinating, it’s time to prepare our dredge – the key to that irresistible crispy coating. In a shallow dish or a large pie plate, combine 1 ½ cups of all-purpose flour, ½ cup of breadcrum extractbs (plain or Italian work equally well here, depending on your preference for subtle herb notes), 2 teaspoons of the regular salt, 2 ½ teaspoons of seasoned salt, ¾ teaspoon of paprika, and 1 teaspoon of black pepper. Whisk all these dry ingredients together thoroughly to ensure the seasonings are evenly distributed. This is where the magic happens, creating a flavorful and textured crust that will adhere beautifully to the chicken.
4. The Double Dip Technique: Once your chicken has marinated, it’s time to get ready for frying. In a separate shallow dish, whisk together your 2 large eggs. Remove the chicken pieces from the buttermilk, allowing any excess to drip off. First, dip each piece of chicken into the whisked eggs, making sure it’s coated on all sides. Let the excess egg drip off. Then, immediately transfer the egg-coated chicken piece into the seasoned flour mixture. Press the chicken firmly into the flour to ensure a good, thick coating, then flip and coat the other side. For an extra-crispy crust, you can perform a “double dip”: after the initial flour coating, dip the chicken back into the egg wash for a second time, and then plunge it back into the flour mixture, pressing firmly again. This creates an even more robust and craggy coating that gets exceptionally crisp when fried. Place the coated chicken pieces on a wire rack set over a baking sheet and let them rest for about 10-15 minutes. This brief rest allows the coating to adhere better, preventing it from flaking off during frying.
5. Frying to Golden Perfection: Now for the grand finnon-alcoholic ale! In a large, heavy-bottomed skillet or Dutch oven, heat 1 ½ cups of vegetable oil over medium-high heat. You want the oil to reach a temperature of about 350-360°F (175-180°C). If you don’t have a thermometer, you can test the oil by dropping a tiny bit of flour into it; it should sizzle immediately and float to the surface. Carefully place your coated chicken pieces into the hot oil, being careful not to overcrowd the pan. You’ll likely need to fry in batches. Fry for about 5-7 minutes per side, or until the chicken is deeply golden brown and cooked through. The internal temperature should reach 165°F (74°C) when tested with a meat thermometer. As each batch is done, remove the chicken from the skillet using tongs and place it on a clean wire rack set over a baking sheet to drain off any excess oil and keep it crispy. You can even pop it into a warm oven (around 200°F/95°C) to keep the fried chicken warm while you cook the remaining batches. Serve immediately and enjoy the fruits of your labor!
Conclusion:
There you have it – your guide to making truly spectacular Country Fried Chicken right in your own kitchen! This recipe isn’t just about fried chicken; it’s about creating that perfect balance of a shatteringly crisp, golden-brown crust and incredibly juicy, tender chicken within. It’s comfort food at its finest, perfect for a family dinner, a weekend treat, or whenever you’re craving something utterly delicious. The simple yet effective seasoning blend ensures every bite is packed with flavor, and the buttermilk soak is key to achieving that signature tenderness.
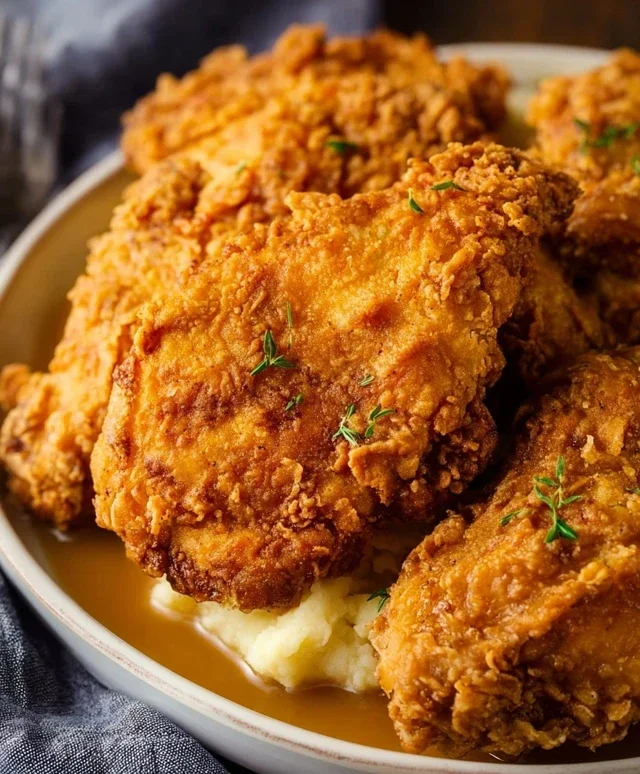
I love serving this Country Fried Chicken with all the classic fixings. Think creamy mashed potatoes with gravy, buttery biscuits, a crisp coleslaw to cut through the richness, and maybe some sweet corn on the cob. It’s a meal that truly warms the soul.
Don’t be afraid to experiment with variations! You can adjust the spice level by adding a pinch of cayenne pepper to the flour mixture, or infuse extra flavor with a bit of garlic powder or onion powder. For a different twist, try using a mix of herbs like thyme or rosemary in your dredge.
I truly encourage you to give this recipe a try. It’s incredibly rewarding to pull that perfectly fried chicken out of the pan, and the taste is absolutely worth it. Get ready for some serious compliments!
Frequently Asked Questions:
Why is my country fried chicken not crispy?
Achieving crispiness often comes down to a few key factors. Ensure your oil is at the correct temperature (around 350-375°F or 175-190°C). If the oil isn’t hot enough, the chicken will absorb too much grease and become soggy. Also, avoid overcrowding the pan; fry in batches so the oil temperature stays consistent. Make sure your flour coating is well-adhered and that you’re not disturbing the chicken too much while it’s frying.
Can I make country fried chicken ahead of time?
While Country Fried Chicken is best enjoyed fresh, you can prepare components ahead. You can bread the chicken a few hours in advance and keep it refrigerated. However, frying is best done just before serving for maximum crispness. If you must reheat, do so in a hot oven (around 375°F or 190°C) for about 10-15 minutes to try and revive some of the crispiness, though it won’t be quite the same as freshly fried.
Country Fried Chicken
A classic Southern-style fried chicken recipe, crispy on the outside and juicy on the inside.
Ingredients
-
4 boneless skinless chicken breasts
-
2 cups buttermilk
-
2 large eggs
-
3 teaspoons salt
-
1 ½ cup all-purpose flour
-
½ cup breadcrumbs
-
2 ½ teaspoons seasoned salt
-
¾ teaspoon paprika
-
½ teaspoon cayenne pepper
-
1 ½ teaspoon black pepper
-
1 ½ cups vegetable oil
Instructions
-
Step 1
In a shallow dish, whisk together the buttermilk and whisked eggs. Add the chicken breasts and marinate for at least 30 minutes, or up to 4 hours in the refrigerator. -
Step 2
In another shallow dish, combine the all-purpose flour, breadcrumbs, seasoned salt, paprika, cayenne pepper, black pepper, and 3 teaspoons of salt. Mix well. -
Step 3
Remove chicken from the buttermilk mixture, letting excess drip off. Dredge each piece of chicken thoroughly in the flour mixture, pressing to ensure it’s well coated. -
Step 4
Heat vegetable oil in a large, heavy skillet over medium-high heat until it reaches about 350°F (175°C). -
Step 5
Carefully place the coated chicken pieces into the hot oil, ensuring not to overcrowd the skillet. Fry in batches if necessary. -
Step 6
Fry for about 5-7 minutes per side, or until golden brown and cooked through. Internal temperature should reach 165°F (74°C). -
Step 7
Remove chicken from the skillet and place on a wire rack set over a baking sheet to drain excess oil.
Important Information
Nutrition Facts (Per Serving)
It is important to consider this information as approximate and not to use it as definitive health advice.
Allergy Information
Please check ingredients for potential allergens and consult a health professional if in doubt.