Easy Ramen Eggs Ajitama- Perfect Topping
Ramen eggs, also known as Ajitama, are more than just a topping; they are a culinary revelation. Imagin extracte a perfectly soft-boiled egg, its yolk impossibly creamy and luscious, bathed in a savory, umami-rich marinade that infuses every bite with complex flavor. This isn’t just any egg; this is the star of countless ramen bowls, the ingredient that elevates a simple noodle soup into a truly unforgettable experience. What makes these ramen eggs so beloved? It’s that incredible balance of textures and tastes: the tender white yielding to the molten gold of the yolk, all enhanced by the sweet and salty embrace of the marinade. They’re surprisingly easy to make, yet their impact on your favorite ramen or even a simple rice bowl is profound. Get ready to discover the magic of mastering your own perfect Ajitama!
Ramen Eggs (Ajitama)
There’s something incredibly satisfying about a perfectly cooked ramen egg, or ajitama. That jammy, golden yolk, infused with a rich, savory marinade – it’s a simple ingredient that elevates any bowl of ramen from good to spectacular. But the beauty of these marinated eggs is that they’re not just for ramen! They make a fantastic addition to noodle bowls, salads, rice dishes, or even just enjoyed as a flavorful snack. Making them at home is surprisingly easy and incredibly rewarding. Forget about the mystery of how to achieve that perfect texture and flavor; I’m here to guide you through the process.
Ingredients:
A quick note on the eggs: I recommend using large eggs as they are standard for most recipes and will yield consistent results. You can experiment with different sizes, but adjust cooking times accordingly.
Preparing the Perfect Eggs
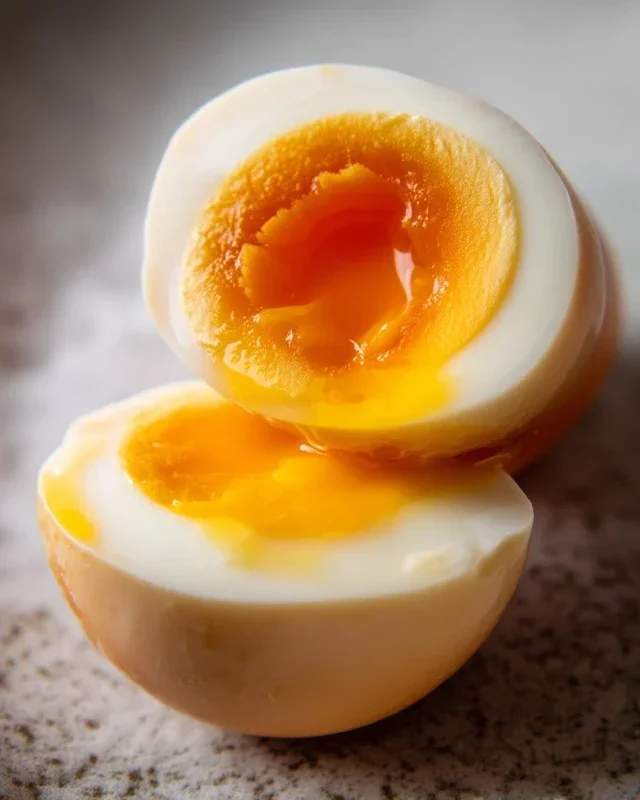
The foundation of a great ajitama is the perfectly cooked soft-boiled egg. The key is to achieve a custardy, jammy yolk and a firm yet tender white.
1. Boiling the Eggs: For the best results, start with eggs that are at room temperature. This helps prevent cracking. Bring a medium saucepan of water to a rolling boil. If you choose to use vinegar, add a splash (about 1 tablespoon) to the boiling water. The vinegar helps to coagulate the egg whites quickly if they do crack, minimizing leakage. Gently lower the eggs into the boiling water using a slotted spoon. Be careful not to drop them, as this can also cause them to crack.
Once the eggs are in, reduce the heat slightly to maintain a gentle boil. Now, set your timer for exactly 6 minutes and 30 seconds. This precise timing is crucial for achieving that desirable jammy yolk. While the eggs are boiling, prepare an ice bath. Fill a bowl with cold water and plenty of ice. This will be essential for stopping the cooking process immediately.
2. Cooling and Peeling: As soon as the timer goes off, immediately transfer the boiled eggs from the hot water into the prepared ice bath. Let them sit in the ice bath for at least 10-15 minutes. This rapid cooling is vital. It halts the cooking process, preventing the yolk from continuing to cook and becoming hard. It also makes the eggs much easier to peel.
Peeling is often the most dreaded part of making soft-boiled eggs. Once the eggs are thoroughly chilled, gently tap each egg on a hard surface to create small cracks all over the shell. Starting from the wider end (where the air pocket usually is), carefully begin extract to peel the shell away. If you’ve properly chilled the eggs and they aren’t too fresh (a few days old is ideal), the shells should slip off relatively easily. If you encounter stubborn spots, run the egg under cool water while you peel.
Crafting the Flavorful Marinade
This is where the magic happens! The marinade infuses the eggs with a beautiful savory-sweet profile that is quintessential to ajitama.
3. Mixing the Marinade: In a medium bowl or a sealable container, combine the soy sauce, water, non-non-non-alcoholic alternativeic non-alcoholic mirin, and granulated sugar. Stir well until the sugar is completely dissolved. I like to use a light sodium soy sauce to keep the marinade from becoming too salty, allowing the other flavors to shine through. The non-alcoholic mirin adds a subtle sweetness and depth, while the sugar balances everything out beautifully. Ensure the sugar is fully dissolved before proceeding, as undissolved sugar can create an uneven flavor.
Marinating the Eggs
Patience is key here, as the longer the eggs marinate, the more intensely flavorful they will become.
4. Infusing the Eggs: Carefully place the peeled, soft-boiled eggs into the marinade. Ensure that the eggs are fully submerged in the liquid. If your container is too small and the eggs are floating, you can use a small plate or a piece of parchment paper to weigh them down. Seal the container or cover the bowl tightly with plastic wrap. Refrigerate the marinated eggs for at least 4 hours, but for the best flavor, I recommend marinating them for 12 to 24 hours. You can even marinate them for up to 48 hours, though the texture of the egg white might start to change slightly after that. During the marinating process, you can gently turn the eggs a few times to ensure even flavor distribution, though this isn’t strictly necessary.
Serving Your Ajitama
Your delicious, homemade ramen eggs are ready to be enjoyed!
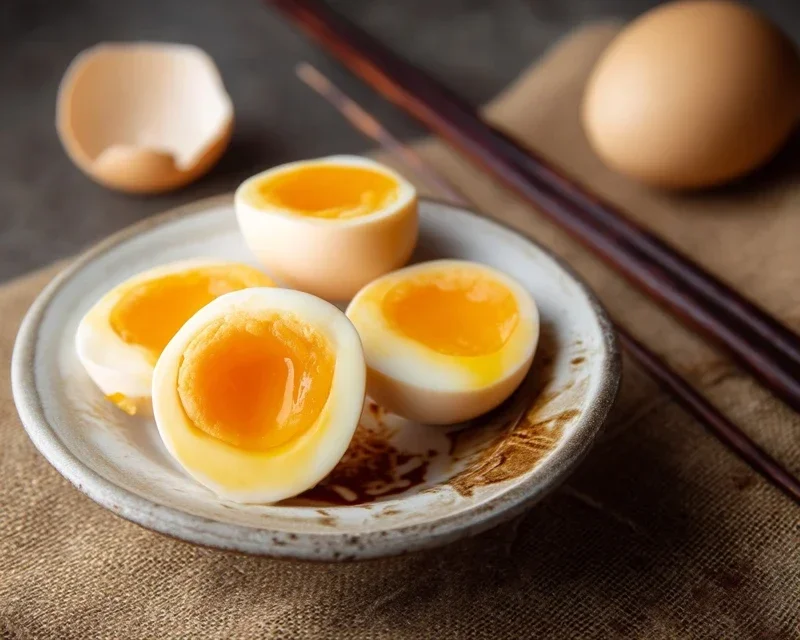
5. Enjoying Your Ajitama: Once your ajitama have marinated to your desired flavor level, you can gently remove them from the marinade. They can be enjoyed whole, or for that classic ramen presentation, you can slice them in half lengthwise. The beautiful contrast between the deep amber marinade, the pearly white egg white, and the rich, golden yolk is truly a sight to behold. Store any unused ajitama in the marinade in an airtight container in the refrigerator for up to 3-4 days. The marinade itself is also packed with flavor and can be reused as a base for dressings or other marinades, though it’s best to strain out any egg residue. These eggs are a game-changer for your homemade ramen, but don’t be afraid to experiment with them in other dishes!
Conclusion:
There you have it! Making perfect Ramen Eggs, also known as Ajitama, is a surprisingly simple yet incredibly rewarding culinary endeavor. The magic lies in the gentle infusion of savory, umami-rich marinade into a perfectly cooked, jammy-yolked egg. These aren’t just any boiled eggs; they are a flavor explosion waiting to happen, transforming any dish they grace. Their versatility is astounding – they are the crowning glory of a steaming bowl of ramen, of course, but they also elevate a simple rice bowl, a quick noodle stir-fry, or even a fresh salad. Don’t be afraid to experiment with the marinade! A splash of non-alcoholic mirin for sweetness, a touch of gin extractger for zing, or even a hint of chili for heat can create your own signature flavor profile.
I truly encourage you to give this Ramen Eggs recipe a try. It’s a fantastic way to add a gourmet touch to your everyday meals without much fuss. You’ll be amazed at how something so straightforward can bring such a depth of flavor and delightful texture. Happy cooking!
Frequently Asked Questions about Ramen Eggs (Ajitama):
Q: How long do Ramen Eggs last in the refrigerator?
A: Properly stored in an airtight container in the refrigerator, your Ramen Eggs should remain delicious for up to 4-5 days. The marinade helps to preserve them, but their texture and flavor are best enjoyed within this timeframe.
Q: Can I make the marinade ahead of time?
A: Absolutely! The marinade can be prepared a day or two in advance and stored in the refrigerator. This makes the actual marinating process even quicker when you’re ready to use it. Ensure it’s well-senon-alcoholic aled.
Q: What if I don’t have soy sauce? Can I substitute it?
A: While soy sauce is the traditional base, you can experiment with other savory sauces. Tamari is a good gluten-free alternative. For a milder flavor, you could try a combination of fish sauce and a little water, though the taste will be quite different. However, for the classic Ajitama flavor, soy sauce is highly recommended.
Ramen Eggs (Ajitama)
Perfectly marinated soft-boiled eggs for ramen.
Ingredients
-
6 large eggs
-
1/2 cup low-sodium soy sauce
-
1/4 cup water
-
1/4 cup non-alcoholic mirin
-
2 tablespoons granulated sugar
-
1 tablespoon rice vinegar
Instructions
-
Step 1
Gently place eggs in a pot and cover with cold water. Add rice vinegar to the water (optional). -
Step 2
Bring water to a rolling boil over medium-high heat. Once boiling, cook for exactly 6-7 minutes for a jammy yolk. -
Step 3
Immediately transfer cooked eggs to an ice bath to stop the cooking process. Let them chill for at least 10 minutes. -
Step 4
While eggs are chilling, prepare the marinade by combining soy sauce, water, non-alcoholic mirin, and sugar in a small saucepan. Heat gently until sugar is dissolved, then let cool completely. -
Step 5
Carefully peel the cooled eggs. -
Step 6
Place the peeled eggs in a zip-top bag or a container. Pour the cooled marinade over the eggs, ensuring they are fully submerged. Seal the bag or container. -
Step 7
Refrigerate for at least 8 hours, or preferably overnight, to allow the eggs to marinate.
Important Information
Nutrition Facts (Per Serving)
It is important to consider this information as approximate and not to use it as definitive health advice.
Allergy Information
Please check ingredients for potential allergens and consult a health professional if in doubt.