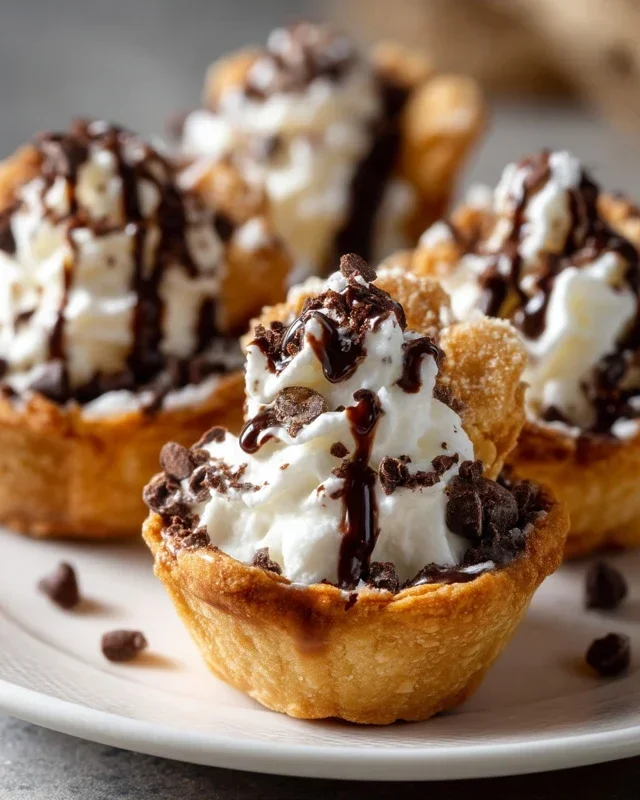
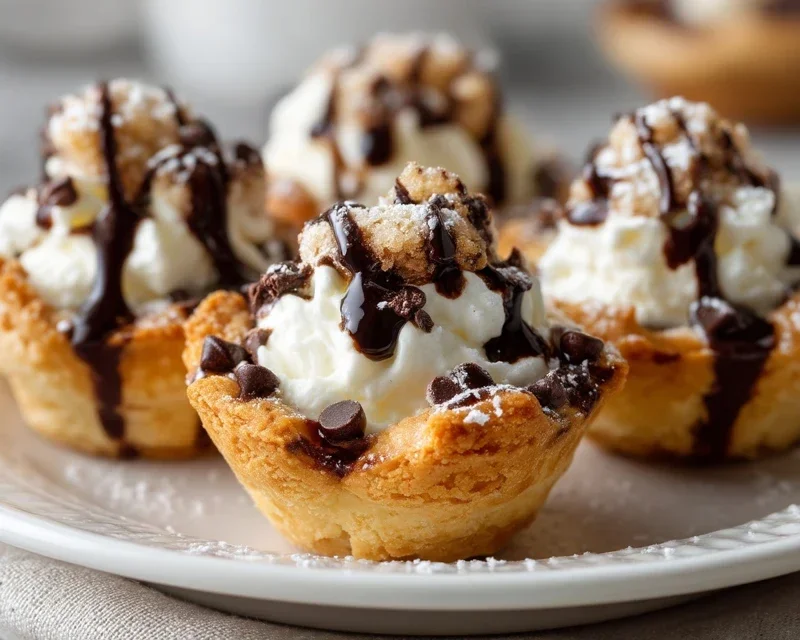
Mini Cannoli Cups-Easy Dessert Perfection
Mini Cannoli Cups are about to become your new favorite sweet obsession! Who can resist the allure of a classic cannoli, but in a perfectly portioned, bite-sized package? I certainly can’t! These delightful treats capture all the magic of their larger, more intimidating cousins, offering a delightful crunch from the delicate pastry shell and a luxuriously smooth, sweet ricotta filling. What makes these mini cannoli cups so incredibly special is their adaptability. They’re perfect for parties, elegant desserts, or even just a little personal indulgence. You get that satisfying snap, that creamy center, and the sheer joy of a perfectly crafted confection, all without the fuss of traditional rolling and frying. Get ready to impress yourself and everyone you share these with!
The Perfect Bite of Italian Sweetness
Why Mini Cannoli Cups Will Steal Your Heart
Mini Cannoli Cups
Craving the delightful crunch and creamy sweetness of cannoli but don’t have the time or inclination to deal with frying pastry shells? I have the perfect solution for you: Mini Cannoli Cups! These adorable, bite-sized treats capture all the essence of traditional cannoli without the fuss. We’re using readily available refrigerated pie crusts to create wonderfully crisp cups that are then filled with a luscious, homemade ricotta filling. They are perfect for parties, a special dessert, or just when you need a little something sweet. Trust me, these are incredibly easy to make and absolutely irresistible.
Ingredients:
Cooking Instructions
Prepare the Ricotta Filling
The heart of any good cannoli is its creamy filling. To get started, you’ll want to ensure your ricotta cheese is well-drained. This is a crucial step to prevent a watery filling. You can drain it by placing it in a fine-mesh sieve lined with cheesecloth or a coffee filter over a bowl and letting it sit for at least 30 minutes, or even overnight in the refrigerator. Once drained, place the ricotta in a medium bowl. Add the powdered sugar, granulated sugar, orange or lemon zest, and vanilla extract. I love the hint of citrus in cannoli, it really brightens up the richness of the cheese. You can use either orange or lemon zest, or even a combination of both. Stir everything together until it’s smooth and creamy. Don’t overmix, just combine until no streaks of sugar remain. Cover the bowl and refrigerate the filling while you prepare the pie crusts. This allows the flavors to meld beautifully.
Create the Pie Crust Cups
Now for the clever part – using refrigerated pie crusts to create our cannoli cups. Preheat your oven to 375°F (190°C). Lightly grease a mini muffin tin. Carefully unroll your softened pie crusts. You’ll want to work with one crust at a time. Using a round cookie cutter or the rim of a glass, cut out circles from the pie crust. I find a 2.5 to 3-inch round cutter works perfectly for mini muffin tins. You should be able to get about 6-8 circles from each pie crust. Gently press each circle of dough into the prepared mini muffin cups, making sure it goes up the sides to form a little cup shape. You want the dough to sit snugly in the tin without tearing. If any dough tears, don’t worry, you can press it back together gently.
Bake the Pie Crust Cups
Once all your mini muffin cups are lined with pie crust, it’s time to bake them until they’re golden brown and crispy. Place the filled muffin tin on a baking sheet (this helps catch any potential drips and makes it easier to transfer). Bake for about 10-15 minutes, or until the edges of the pie crust are puffed and nicely golden. Keep a close eye on them as they can go from perfectly golden to burnt quickly. If some cups brown faster than others, you can carefully remove them from the oven. Let the baked cups cool in the muffin tin for a few minutes before carefully transferring them to a wire rack to cool completely. They need to be totally cool before filling, otherwise, the heat will melt the ricotta.
Prepare the Cinnamon-Sugar Coating
While the pie crust cups are cooling, let’s get our cinnamon-sugar mixture ready. In a small shallow bowl or plate, combine the turbinado sugar and ground cinnamon. Stir them together well. This mixture will be used to add a delightful crunchy, spiced exterior to our cannoli cups. Turbinado sugar has larger granules than regular granulated sugar, which gives a fantastic texture when baked onto the crust. The cinnamon adds a warm, inviting aroma and flavor that complements the sweet ricotta filling.
Assemble and Finish the Mini Cannoli Cups
Once the pie crust cups are completely cool, it’s time for the fun part – filling and decorating! Spoon or pipe the chilled ricotta filling into each of the cooled pie crust cups. You can use a piping bag for a more professional look, or simply a spoon for a more rustic, homemade touch. Now, for the final flourish. You can either dip the edges of the filled cannoli cups into the cinnamon-sugar mixture, or sprinkle it over the top. I like to gently press the filling-coated edges into the cinnamon-sugar for an extra layer of crunch and flavor. Finally, sprinkle the miniature chocolate chips or finely chopped pistachios over the top of the filling. They add a lovely pop of color and a delightful textural contrast. Dust generously with additional powdered sugar just before serving. These are best enjoyed the same day they are made to ensure the crispiest crust.
Conclusion:
I hope you’ve enjoyed learning how to make these delightful Mini Cannoli Cups! They truly are a fantastic treat, offering all the classic, creamy, and crunchy goodness of traditional cannoli in a perfectly portioned, bite-sized package. The crisp, golden shells perfectly complement the rich ricotta filling, creating a symphony of textures and flavors that’s simply irresistible. These little cups are incredibly versatile and perfect for any occasion, from a casual dessert gathering to a more elegant party. Don’t be intimidated by the idea of making cannoli; this recipe breaks it down into manageable steps. I genuinely encourage you to give these Mini Cannoli Cups a try – you won’t be disappointed with the delicious results and the smiles they bring!
For serving, consider dusting them with a little extra powdered sugar, or drizzling with a touch of melted chocolate. They’re also wonderful served alongside fresh berries for a pop of color and freshness. If you’re feeling adventurous, try adding a pinch of cinnamon or a hint of orange zest to your ricotta filling for a new flavor dimension. You could even experiment with different toppings like finely chopped pistachios or mini chocolate chips.
Frequently Asked Questions:
Can I make the cannoli shells ahead of time?
Yes, absolutely! The cannoli shells can be baked and stored in an airtight container at room temperature for up to 2-3 days once completely cooled. However, for the best crispness, it’s ideal to fill them closer to serving time, as the filling can soften the shells over time.
What can I do if my ricotta filling is too watery?
If your ricotta filling seems too watery, the best solution is to drain the ricotta thoroughly before mixing. You can do this by placing the ricotta in a fine-mesh sieve lined with cheesecloth over a bowl in the refrigerator for at least a few hours, or even overnight, to allow excess liquid to drip away.
Are there any gluten-free options for the cannoli shells?
While traditional cannoli shells are made with wheat flour, you can experiment with gluten-free all-purpose flour blends designed for baking. The texture and crispness might vary, so it’s worth testing a small batch first to see how your chosen blend performs.
Mini Cannoli Cups
Quick and easy mini cannoli cups using refrigerated pie crusts for a delightful dessert.
Ingredients
-
1 container whole-milk ricotta cheese (15 oz., drained)
-
1/2 cup powdered sugar
-
2 tablespoons granulated sugar
-
1 teaspoon finely grated orange zest
-
1/2 teaspoon vanilla extract
-
1 box refrigerated pie crusts, softened as directed on box (2 count )
-
3 tablespoons turbinado sugar (raw sugar)
-
1 teaspoon ground cinnamon
-
1/4 cup miniature semisweet chocolate chips
-
additional powdered sugar, for dusting
Instructions
-
Step 1
Preheat oven to 375°F (190°C). Grease and lightly flour a 12-cup muffin tin. -
Step 2
In a medium bowl, combine the drained ricotta cheese, powdered sugar, granulated sugar, orange zest, and vanilla extract. Stir until well combined and smooth. -
Step 3
Unroll the refrigerated pie crusts. Cut out 3-inch circles from each crust. You should get 6 circles per crust, for a total of 12. -
Step 4
Gently press each pie crust circle into the muffin cups, forming a shell. -
Step 5
Bake for 10-12 minutes, or until the edges are golden brown. -
Step 6
While the crusts are baking, in a small bowl, combine the turbinado sugar and ground cinnamon. -
Step 7
Remove the muffin tin from the oven and let the crusts cool in the tin for a few minutes before carefully removing them and transferring them to a wire rack to cool completely. -
Step 8
Once cooled, fill each cannoli cup with the ricotta mixture. Top with miniature chocolate chips or chopped pistachios. -
Step 9
Dust with additional powdered sugar before serving.
Important Information
Nutrition Facts (Per Serving)
It is important to consider this information as approximate and not to use it as definitive health advice.
Allergy Information
Please check ingredients for potential allergens and consult a health professional if in doubt.