Peanut Butter Cup Chocolate Roll Cake Recipe
Peanut Butter Cup Chocolate Roll Cake is about to become your new obsession. Forget everything you thought you knew about dessert; this is a game-changer. We all have those cravings, right? That irresistible pull towards the perfect combination of rich chocolate and creamy peanut butter. It’s a classic for a reason, a flavor pairing that speaks directly to our comfort food souls. But what if I told you we could elevate this beloved duo into something truly spectacular? This Peanut Butter Cup Chocolate Roll Cake isn’t just a dessert; it’s an experience. Imagin extracte a light, airy chocolate sponge cake, rolled to perfection and generously filled with a decadent peanut butter frosting, all swirled together to create a visually stunning and utterly delicious masterpiece. It’s the ultimate indulgence for any chocolate and peanut butter lover, and surprisingly easier to make than you might think!
Ingredients:
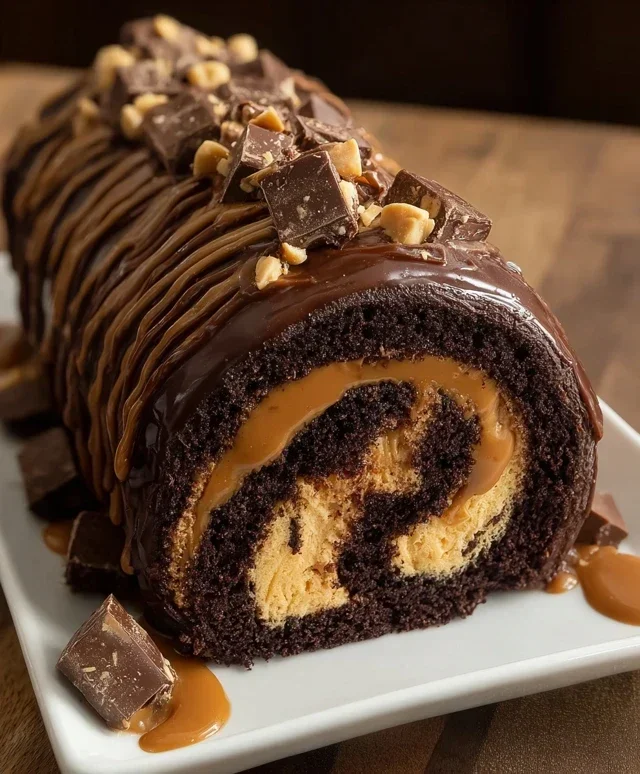
Peanut Butter Cup Chocolate Roll Cake
Prepare to embark on a delicious journey with this Peanut Butter Cup Chocolate Roll Cake! This decadent dessert is surprisingly achievable and promises a delightful combination of rich chocolate, creamy peanut butter, and a perfectly tender cake. It’s the kind of showstopper that impresses guests but is simple enough for a weekend treat. The secret to a successful roll cake lies in a light and airy cake batter and careful rolling techniques, which we’ll go through step-by-step.
Preparing the Chocolate Cake Base
The foundation of our roll cake is a delicate chocolate sponge. We’ll start by whisking together our dry ingredients. In a medium bowl, combine the all-purpose flour, unsweetened cocoa powder, baking powder, and salt. Whisking these together ensures that the leavening agents and salt are evenly distributed throughout the flour, which is crucial for an even rise. Set this aside.
Next, in a large bowl, we’ll tackle the eggs and granulated sugar. Using an electric mixer, beat the 4 large eggs with the 1/2 cup of granulated sugar. You want to beat this mixture until it becomes pnon-alcoholic ale yellow and thick, forming ribbons when you lift the beaters. This process, often called “ribbon stage,” incorporates air into the batter, which is essential for the cake’s lightness. This can take about 5-7 minutes on medium-high speed.
Now, it’s time to gently incorporate the dry ingredients into the egg mixture. Sift the dry ingredients in two additions over the beaten eggs, gently folding them in with a spatula after each addition. Be careful not to overmix here. We want to preserve that airiness we worked so hard to create. Folding just until the streaks of flour disappear is key.
Spread the batter evenly into a 10×15 inch jelly roll pan that has been greased and lined with parchment paper. Make sure the parchment paper extends slightly up the sides to help with easy removal. Gently tap the pan on the counter a couple of times to release any large air bubbles. Bake in a preheated oven at 350°F (175°C) for about 12-15 minutes, or until a toothpick inserted into the center comes out clean and the cake springs back lightly when touched.
While the cake is baking, prepare a clean kitchen towel or parchment paper. Lightly dust it with powdered sugar. As soon as the cake is out of the oven, carefully invert it onto the prepared towel. Peel off the parchment paper that was on the bottom of the cake. Starting from one of the short ends, carefully roll up the warm cake with the towel inside. This step is crucial for setting the cake’s shape and preventing it from cracking when you roll it with the filling. Let it cool completely in this rolled state.
Crafting the Peanut Butter Filling
Now for the star of the show: the peanut butter filling! In a separate bowl, beat together the 1/2 cup of smooth peanut butter and the 1/2 cup of heavy cream. You can use an electric mixer or a whisk for this. Continue beating until the mixture is smooth, creamy, and well combined.
Gradually add the 1 cup of powdered sugar to the peanut butter and cream mixture, beating until it’s fully incorporated and the filling is thick enough to spread. It should have a consistency similar to a thick frosting. If it seems too stiff, you can add a tiny splash more heavy cream. If it’s too runny, add a bit more powdered sugar, a tablespoon at a time.
Assembling and Finishing Your Masterpiece
Once the chocolate cake has cooled completely, carefully unroll it. You’ll see it holds its shape beautifully. Spread the creamy peanut butter filling evenly over the unfurled cake, leaving about a 1/2 inch border around the edges. Sprinkle the chopped mini peanut butter cups evenly over the filling. This adds delightful pockets of peanut butter cup goodness throughout your roll cake.
Gently re-roll the cake, this time without the towel, starting from the same short end as before. Try to roll it snugly but without pressing too hard, which could cause the filling to squish out. Place the rolled cake seam-side down on a serving platter.
To finish, dust the top of the roll cake generously with the remaining 1/4 cup of powdered sugar. You can use a fine-mesh sieve for an even coating. For an extra touch of indulgence, you can drizzle some melted chocolate or even add a few more chopped peanut butter cups on top for decoration.
Chill the roll cake in the refrigerator for at least 30 minutes before slicing. This allows the filling to set and makes it easier to get clean slices. Serve this Peanut Butter Cup Chocolate Roll Cake with a dollop of whipped cream or a scoop of ice cream for the ultimate treat. Enjoy every delightful bite!
Conclusion:
I truly hope you’ve enjoyed learning how to make this incredible Peanut Butter Cup Chocolate Roll Cake! This recipe is a showstopper, combining the rich decadence of chocolate with the irresistible allure of peanut butter cups in a delightful rolled cake format. It’s surprisingly achievable and the results are consistently impressive, making it perfect for celebrations, special occasions, or simply when you crave a truly memorable dessert. The light and airy chocolate sponge cake perfectly cradles the creamy peanut butter frosting and chopped peanut butter cup filling, offering a symphony of textures and flavors in every bite.
When it comes to serving, this cake is fantastic on its own. However, consider a dollop of fresh whipped cream or a scoop of vanilla bean ice cream to elevate it even further. For variations, don’t hesitate to experiment! You could add a swirl of chocolate ganache to the frosting, or use different types of chocolate chips within the filling. Perhaps a sprinkle of sea salt on top would add a lovely sweet and salty contrast.
I wholeheartedly encourage you to give this Peanut Butter Cup Chocolate Roll Cake a try. It’s a labor of love, but one that rewards you with immense satisfaction and delighted smiles. You won’t regret diving into this chocolatey, peanut buttery dream!
Frequently Asked Questions:
Q: My chocolate sponge cake cracked when I rolled it. What went wrong?
A: Don’t worry, a little crack is very common and often doesn’t affect the final look, especially once it’s filled and frosted. Common causes include over-baking the cake, rolling it while it’s too hot (let it cool for about 10-15 minutes before attempting to roll), or not using parchment paper. Ensure your oven temperature is accurate and try to be gentle when rolling.
Q: Can I make this cake ahead of time?
A: Yes, absolutely! You can bake the cake and let it cool completely, then wrap it tightly in plastic wrap and refrigerate it overnight. The frosting can also be made ahead and stored in the refrigerator. Just bring the frosting to room temperature and re-whip it before assembling the cake. This makes it a great option for entertaining!
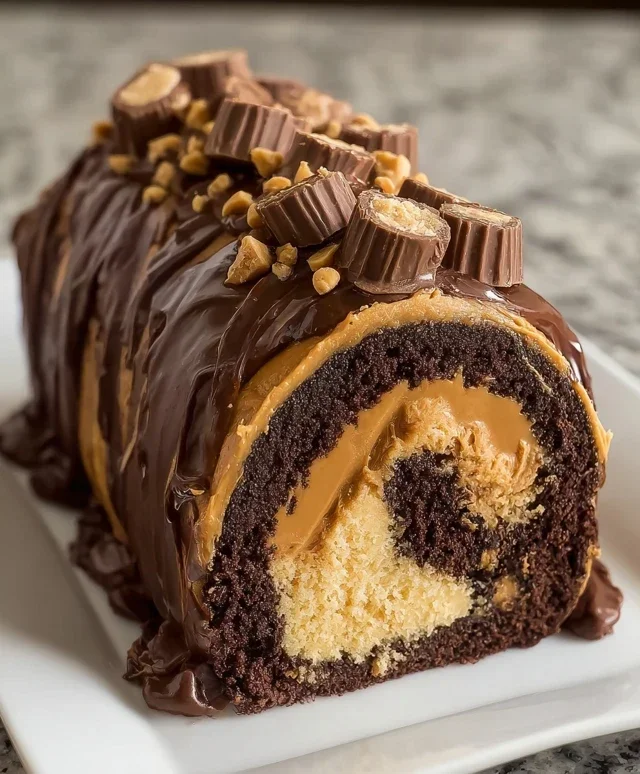
Peanut Butter Cup Chocolate Roll Cake
A decadent chocolate cake rolled with a creamy peanut butter filling and studded with chopped peanut butter cups. Perfect for dessert or a special occasion.
Ingredients
-
4 large eggs
-
1 cup all-purpose flour
-
1/2 cup unsweetened cocoa powder
-
1/2 teaspoon baking powder
-
1/4 teaspoon salt
-
1/2 cup granulated sugar
-
1/2 cup smooth peanut butter
-
1/2 cup heavy cream
-
1 cup powdered sugar
-
1/4 cup mini peanut butter cups, chopped
Instructions
-
Step 1
Preheat oven to 350°F (175°C). Grease and flour a 10×15 inch jelly roll pan. Line with parchment paper, leaving an overhang on the sides. -
Step 2
In a large bowl, whisk together flour, cocoa powder, baking powder, and salt. -
Step 3
In a separate bowl, beat eggs and granulated sugar until pale and thick, about 3-5 minutes. Gently fold in the dry ingredients until just combined. -
Step 4
Spread batter evenly into the prepared pan. Bake for 12-15 minutes, or until a toothpick inserted into the center comes out clean. -
Step 5
While the cake is baking, prepare the filling. In a medium bowl, beat together peanut butter, heavy cream, and 1 cup powdered sugar until smooth and creamy. Fold in the chopped peanut butter cups. -
Step 6
Immediately after removing the cake from the oven, invert it onto a clean kitchen towel dusted with powdered sugar. Carefully peel off the parchment paper. Starting from one short end, tightly roll up the cake and towel together. Let cool completely. -
Step 7
Once cooled, unroll the cake. Spread the peanut butter filling evenly over the surface, leaving a small border. Roll the cake back up, without the towel this time. Chill for at least 30 minutes before slicing and serving.
Important Information
Nutrition Facts (Per Serving)
It is important to consider this information as approximate and not to use it as definitive health advice.
Allergy Information
Please check ingredients for potential allergens and consult a health professional if in doubt.