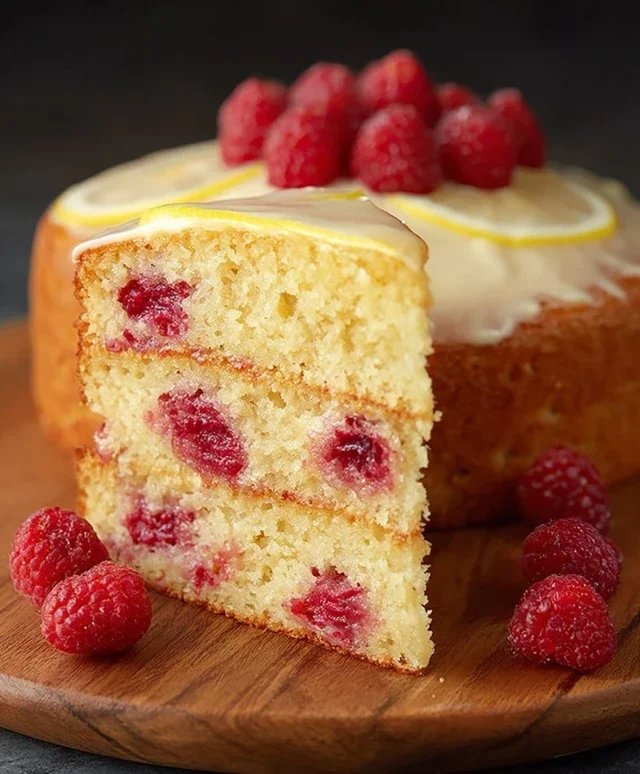
Easy Raspberry Lemon Cake – Delicious & Simple
Raspberry Lemon Cake is a symphony of sweet and tart, a burst of sunshine on a plate that I absolutely adore. There’s something incredibly magical about the way the vibrant, slightly tangy raspberries dance with the bright, zesty lemon in this delightful creation. It’s no wonder this flavor combination is a timeless favorite; it evokes feelings of summer picnics, elegant afternoon teas, and pure, unadulterated joy. What makes this particular Raspberry Lemon Cake truly special is the perfect balance we achieve. We’re not just talking about a cake; we’re talking about a moist, tender crum extractb infused with genuine lemon zest and studded with juicy raspberry gems. It’s a recipe that promises to impress, delivering a sophisticated yet utterly comforting dessert experience that will have everyone asking for seconds.
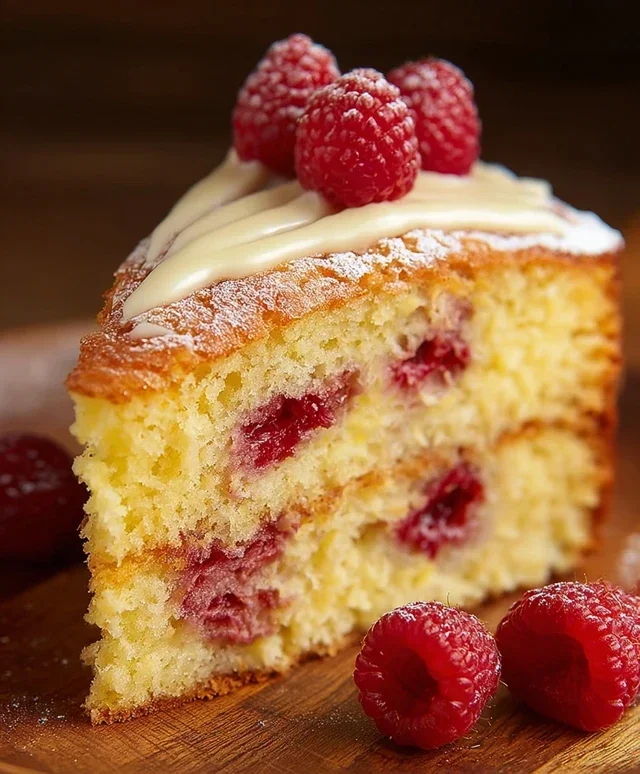
Raspberry Lemon Cake
This Raspberry Lemon Cake is a bright, zesty, and wonderfully moist treat that’s perfect for any occasion, from a special celebration to an afternoon pick-me-up. The combination of tart raspberries and vibrant lemon is simply irresistible, and the tender, gluten-free crum extractb makes it a delight for everyone to enjoy. I’ve worked to perfect this recipe to ensure it’s bursting with flavor and has a beautiful texture, all while being completely gluten-free. The tangy lemon glaze adds the perfect finishing touch, making this cake a showstopper that’s surprisingly easy to make.
Ingredients:
Baking the Cake
The journey to this delicious cake begin extracts with preparing your cake batter. It’s crucial to have all your ingredients at room temperature for the best emulsion and texture. This means your butter, eggs, and even your yogurt and milk should have been sitting out for a little while. This allows them to incorporate smoothly into each other, preventing a dense or oily cake.
1. Preheat and Prep: Begin extract by preheating your oven to 350°F (175°C). Grease and flour two 9-inch round cake pans, or line them with parchment paper. This step is vital for ensuring your cakes release cleanly after baking, preventing any frustrating sticking. For gluten-free flour, I often find a light dusting of gluten-free flour or even almond flour works wonders for coating the pans.
2. Combine Dry Ingredients: In a large mixing bowl, whisk together the 3 cups of gluten-free flour, 1 ½ cups of sugar, 1 tablespoon of baking powder, ¾ teaspoon of baking soda, and ½ teaspoon of salt. Whisking these dry ingredients together thoroughly ensures that the leavening agents and salt are evenly distributed throughout the flour, which will lead to a more consistent rise and flavor in your cake.
3. Cream Butter and Sugar: In a separate, larger mixing bowl, cream together the 1 cup of room-temperature unsalted butter and the 1 ½ cups of sugar. Beat them with an electric mixer on medium-high speed until the mixture is light and fluffy, pnon-alcoholic ale yellow in color, and has increased in volume. This creaming process incorporates air into the batter, which is essential for a tender and light cake texture. Don’t rush this step; it typically takes about 3-5 minutes.
4. Incorporate Wet Ingredients: Add the 3 eggs, one at a time, beating well after each addition until fully incorporated. Scrape down the sides of the bowl as needed to ensure everything is mixed evenly. Next, gradually beat in the 1 cup of unsweetened plain yogurt and the ¼ cup of milk. This combination will create a wonderfully moist and tender crum extractb. Finally, stir in the 3 tablespoons of lemon zest and the ⅓ cup of lemon juice. The lemon zest provides an intense burst of citrus flavor, while the juice adds moisture and tartness.
5. Combine Wet and Dry & Fold in Raspberries: Gradually add the dry ingredients to the wet ingredients, mixing on low speed just until combined. Be careful not to overmix, as this can develop the gluten in gluten-free flours too much, leading to a tougher cake. In a small bowl, gently toss the 2 cups of fresh raspberries with 1 tablespoon of the gluten-free flour. This light coating helps prevent the raspberries from sinking to the bottom of the cake while it bakes. Gently fold the floured raspberries into the batter using a spatula.
6. Bake the Cakes: Divide the batter evenly between the prepared cake pans. Bake for 25-35 minutes, or until a wooden skewer or toothpick inserted into the center of the cakes comes out clean. The baking time can vary depending on your oven, so keep an eye on them towards the end of the suggested time. Once baked, let the cakes cool in their pans for about 10-15 minutes before inverting them onto a wire rack to cool completely. It’s essential that the cakes are entirely cool before frosting, otherwise, your frosting will melt and slide right off.
Lemon Cream Cheese Frosting
While your cakes are cooling, it’s time to whip up a luscious lemon frosting that perfectly complements the cake. This frosting is rich, tangy, and wonderfully smooth.
1. Cream the Butter: In a large mixing bowl, beat the 2 cups of room-temperature unsalted butter with an electric mixer until smooth and creamy.
2. Add Powdered Sugar and Lemon Juice: Gradually add the 5 cups of powdered sugar, alternating with the 2 teaspoons of lemon juice, beating until smooth and well combined. If the frosting seems too thick, you can add a tiny bit more milk or lemon juice, a teaspoon at a time, until it reaches your desired consistency. If it’s too thin, add more powdered sugar.
Assembling Your Masterpiece
Once your cakes are completely cooled and your frosting is ready, it’s time to bring it all together.
1. Level and Frost: If your cakes have domed tops, you can carefully level them with a serrated knife so they are flat. Place one cake layer on your serving plate. Spread a generous layer of the lemon frosting over the top. Carefully place the second cake layer on top.
2. Decorate: Frost the entire cake with the remaining lemon frosting, smoothing it over the top and sides. You can create swirls with your spatula for a more rustic look, or aim for a perfectly smooth finish. For an extra touch, garnish with fresh raspberries or thin slices of lemon.
Enjoy this delightful Raspberry Lemon Cake! It’s a true celebration of bright, fresh flavors, and I hope it brings a smile to your face.
Conclusion:
I hope you’re as excited to bake this Raspberry Lemon Cake as I am to share it! This recipe is truly a triumph of bright, zesty lemon flavors beautifully complemented by the sweet tang of fresh raspberries. It’s incredibly moist, has a delightful crum extractb, and the vibrant colors make it a showstopper for any occasion. Whether you’re a seasoned baker or just starting out, the straightforward steps ensure a delicious outcome. I love serving this cake slightly warm with a dollop of freshly whipped cream or a dusting of powdered sugar. For a more decadent treat, a cream cheese frosting or a light lemon glaze would be divine. Feel free to experiment with different berries – blueberries or strawberries would be lovely substitutes for raspberries. Don’t hesitate to add a hint of vanilla extract to the batter for an extra layer of flavor. This Raspberry Lemon Cake is guaranteed to become a favorite. So, preheat your ovens, gather your ingredients, and experience the joy of baking this wonderful treat!
Frequently Asked Questions:
Can I use frozen raspberries instead of fresh?
Absolutely! If using frozen raspberries, make sure they are fully thawed and gently drained of excess moisture before folding them into the batter. This helps prevent the cake from becoming too wet.
How should I store this Raspberry Lemon Cake?
This cake stays wonderfully moist. You can store it at room temperature, covered tightly, for up to 3 days. For longer storage, it can be refrigerated for up to a week, though it’s best served at room temperature.
Can I make cupcakes from this recipe?
Yes, this Raspberry Lemon Cake batter is perfect for cupcakes! Simply fill cupcake liners about two-thirds full and adjust the baking time – they usually take around 18-22 minutes to bake.
Raspberry Lemon Cake
A vibrant and moist gluten-free cake bursting with fresh raspberry and lemon flavors, topped with a zesty lemon buttercream frosting.
Ingredients
-
3 cups gluten-free flour
-
1 ½ cups sugar
-
1 cup unsalted butter, room temperature
-
1 cup unsweetened plain yogurt
-
¼ cup milk
-
1 tbsp baking powder
-
¾ tsp baking soda
-
½ tsp salt
-
3 eggs
-
3 tbsp lemon zest
-
⅓ cup lemon juice
-
2 cups fresh raspberries
-
2 cups unsalted butter, room temperature
-
5 cups powdered sugar
-
2 tsp lemon juice
Instructions
-
Step 1
Preheat oven to 350°F (175°C). Grease and flour two 9-inch round cake pans. -
Step 2
In a large bowl, cream together 1 cup of room temperature unsalted butter and 1 ½ cups sugar until light and fluffy. -
Step 3
Beat in eggs one at a time, then stir in 1 cup unsweetened plain yogurt, ¼ cup milk, 3 tbsp lemon zest, and ⅓ cup lemon juice. -
Step 4
In a separate bowl, whisk together 3 cups gluten-free flour, 1 tbsp baking powder, ¾ tsp baking soda, and ½ tsp salt. -
Step 5
Gradually add the dry ingredients to the wet ingredients, mixing until just combined. Gently fold in 2 cups fresh raspberries. -
Step 6
Divide batter evenly between the prepared pans and bake for 30-35 minutes, or until a wooden skewer inserted into the center comes out clean. -
Step 7
Let cakes cool in the pans for 10 minutes before inverting them onto a wire rack to cool completely. -
Step 8
For the frosting, beat 2 cups room temperature unsalted butter until creamy. Gradually add 5 cups powdered sugar, alternating with 2 tsp lemon juice, until smooth and fluffy. -
Step 9
Frost the cooled cakes with the lemon buttercream.
Important Information
Nutrition Facts (Per Serving)
It is important to consider this information as approximate and not to use it as definitive health advice.
Allergy Information
Please check ingredients for potential allergens and consult a health professional if in doubt.