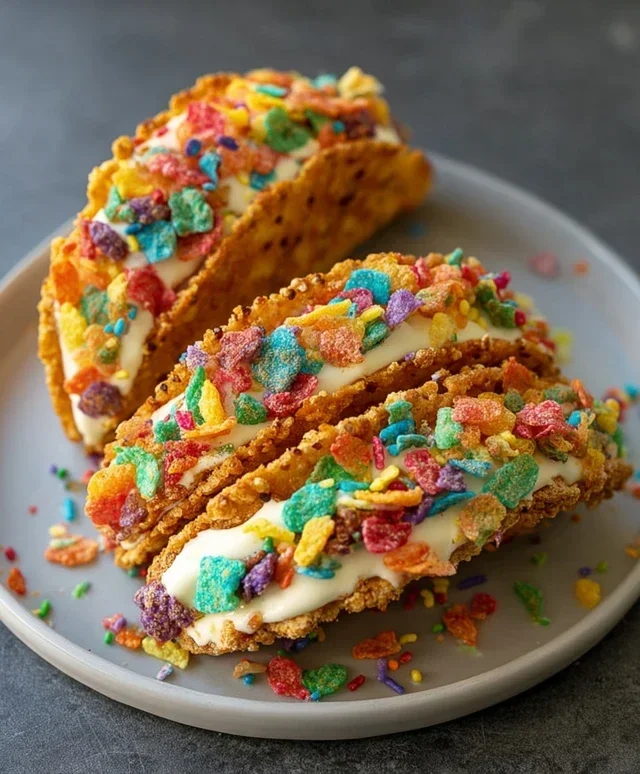
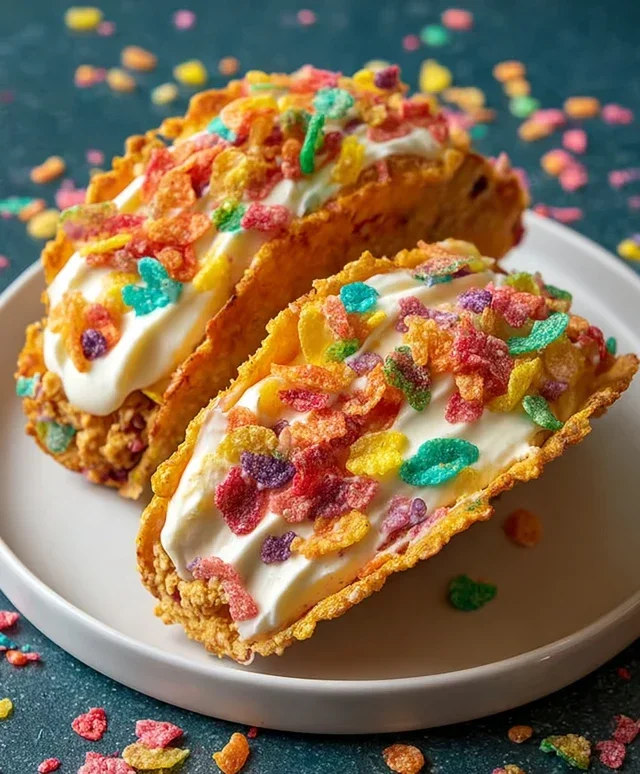
Fruity Pebbles Cheesecake Tacos-Sweet Dessert Fun
Fruity Pebbles Cheesecake Tacos are the whimsical, sweet treat you didn’t know you were craving, but now absolutely need in your life! Imagin extracte the vibrant crunch of your childhood favorite cereal, Fruity Pebbles, transforming into the perfect edible shell for a luxuriously creamy, tangy cheesecake filling. It’s a playful explosion of color and flavor that instantly transports you back to carefree days, but with a sophisticated dessert twist.
Why do we love Fruity Pebbles Cheesecake Tacos so much?
Because they’re impossibly fun! They’re a delightful departure from the ordinary, offering a unique textural contrast and a symphony of sweet, fruity notes. Each bite is a celebration, a miniature masterpiece that’s as beautiful to look at as it is delicious to devour. These aren’t just desserts; they’re an experience. They’re perfect for parties, a fun family activity, or just a treat-yourself moment when you want something truly special. Get ready to fall in love with these amazing Fruity Pebbles Cheesecake Tacos!
Fruity Pebbles Cheesecake Tacos
Get ready for a flavor explosion that’s as vibrant as it is delicious! These Fruity Pebbles Cheesecake Tacos are a playful and utterly irresistible treat that combines the creamy indulgence of cheesecake with the delightful crunch and fruity fun of your favorite childhood cereal. Forget everything you thought you knew about tacos, because these are sweet, whimsical, and guaranteed to bring a smile to everyone’s face. They’re perfect for a fun dessert night, a birthday party, or anytime you’re craving something a little out of the ordinary. The colorful cereal not only forms the “taco shell” but also infuses the creamy filling with its signature fruity essence. This recipe is surprisingly easy to put together, making it a fantastic project to do with kids or to impress your friends with your dessert creativity. Let’s dive into making these cheerful little masterpieces!
Ingredients:
Crafting the Fruity Pebbles Taco Shells
The foundation of our delicious creation starts with transforming the colorful fruity cereal into edible taco shells. This step is surprisingly simple and incredibly rewarding, as you’re essentially baking edible bowls that will hold our creamy cheesecake filling. Make sure to measure your cereal accurately – we want enough to create sturdy shells that can hold all the goodness we’re about to add.
1. Begin extract by gently crushing 2 cups of the colorful fruity cereal. You don’t want to pulverize it into dust, but rather break it down into smaller pieces, with some slightly larger chunks remaining for texture. A food processor can be your best friend here, pulsed a few times until you achieve the desired consistency. Alternatively, you can place the cereal in a zip-top bag and gently crush it with a rolling pin or the flat side of a heavy object. It’s important to have a mix of textures to ensure the shells have both structure and that satisfying crunch.
2. In a medium bowl, combine the crushed cereal with the melted unsalted butter. Stir until all the cereal pieces are well coated with the butter. This butter acts as a binder, helping the cereal stick together when pressed into shape. Think of it like a crispy, fruity cement!
3. Now, it’s time to form our taco shells. You can use a mini muffin tin or small ramekins for this. Lightly grease your muffin tin or ramekins to prevent sticking. Spoon the cereal mixture into each cup of the muffin tin or ramekin, pressing it firmly into the bottom and up the sides to create a shell-like shape. Use the back of a spoon or your fingers to really pack it in, ensuring there are no gaps and the sides are sturdy. The firmer you press, the more stable your taco shells will be. For a slightly more “folded” taco appearance, you can gently press a little more into the center of the shell to create a slight crease.
4. Once your shells are formed, place the muffin tin or ramekins in the refrigerator for at least 30 minutes. This chilling period is crucial as it allows the butter to solidify, binding the cereal together and making the shells firm enough to handle. You can also pop them in the freezer for about 15 minutes if you’re short on time, but be careful not to freeze them solid. The goal is to make them firm and cohesive.
Whipping Up the Creamy Cheesecake Filling
While our taco shells are firming up, we’ll prepare the luscious cheesecake filling. This filling is wonderfully light and airy, perfectly complementing the crunchy cereal shells.
1. In a separate medium bowl, beat the softened cream cheese until it’s smooth and creamy. This is best done with an electric mixer, but a whisk will also work if you’re feeling ambitious. Ensure there are no lumps; a smooth base is key to a silky filling. Make sure your cream cheese is truly softened – leaving it out on the counter for about an hour should do the trick.
2. Gradually add the sifted powdered sugar to the cream cheese, beating until well combined and no powdery streaks remain. Sifting the powdered sugar prevents any lumps from forming in your filling, ensuring a smooth and professional finish.
3. Stir in the pure vanilla extract. The vanilla adds a beautiful depth of flavor that balances the sweetness and enhances the fruity notes of the cereal.
4. Gently fold in the whipped cream until just combined. Be careful not to overmix at this stage, as you want to maintain the airy texture of the whipped cream. The filling should be light, fluffy, and beautifully smooth.
Assembling Your Fruity Pebbles Cheesecake Tacos
The moment of truth! It’s time to bring all our delicious components together to create these show-stopping treats.
1. Once your Fruity Pebbles taco shells are firm, carefully remove them from the muffin tin or ramekins. You might need to gently run a thin knife around the edges to help release them if they seem a bit stuck.
2. Spoon or pipe the creamy cheesecake filling into each of the chilled taco shells. Don’t be shy! Fill them generously. Using a piping bag with a star tip can add a lovely decorative touch, but a simple spoon works perfectly well too.
3. For the final flourish, sprinkle additional colorful fruity cereal over the top of the cheesecake filling. This adds an extra pop of color, texture, and of course, more of that delightful fruity flavor. You can also add a few whole pieces of cereal for visual appeal.
These Fruity Pebbles Cheesecake Tacos are best enjoyed immediately to experience the full contrast of the crunchy shell and the creamy filling. They are a delightful adventure for your taste buds and a guaranteed hit for any occasion!
Conclusion:
And there you have it – your guide to creating these absolutely delightful Fruity Pebbles Cheesecake Tacos! This recipe is a winner because it perfectly balances the creamy, tangy richness of cheesecake with the playful crunch and vibrant flavors of Fruity Pebbles cereal, all wrapped up in a fun, handheld taco shell. It’s a dessert that’s as visually appealing as it is delicious, making it a guaranteed hit for parties, celebrations, or even just a special treat for yourself. I love how versatile these are – you can easily adapt them to suit your tastes and occasions.
For serving, think about a festive dessert platter. They are perfect as individual desserts, or you could offer them alongside fresh berries or a dollop of whipped cream for extra indulgence. Want to get creative with variations? You could experiment with different flavored cream cheese fillings, perhaps a strawberry or lemon zest swirl. For a different texture, consider using crum extractbled cookies as a base instead of just the cereal, or even try a chocolate or waffle cone taco shell. Don’t be afraid to play around and make these Fruity Pebbles Cheesecake Tacos your own! I truly encourage you to give this recipe a try; it’s incredibly rewarding and so much fun to make.
Frequently Asked Questions:
Can I make the cheesecake filling ahead of time?
Absolutely! You can prepare the cheesecake filling up to 24 hours in advance and store it covered in the refrigerator. This can save you valuable time on the day you plan to assemble your tacos.
What kind of taco shells work best?
For this recipe, we’re aiming for a slightly sweet and sturdy shell. Waffle cone taco shells are fantastic as they offer a wonderful texture and subtle sweetness that complements the filling. Alternatively, you could lightly bake flour tortillas until they are slightly crispy and hold their shape, or even use store-bought dessert taco shells.
Are there any dairy-free options?
Yes! For a dairy-free version, you can substitute the cream cheese with a good quality dairy-free cream cheese alternative and use a dairy-free milk or cream for the filling. Ensure your Fruity Pebbles are also dairy-free, as ingredients can vary by region.
Fruity Pebbles Cheesecake Tacos
A fun and colorful dessert taco featuring a creamy Fruity Pebbles cheesecake filling nestled in a crisp cereal shell, garnished with more cereal.
Ingredients
-
3 cups colorful fruity cereal
-
1/2 cup unsalted butter, melted
-
8 oz cream cheese, softened
-
1/2 cup powdered sugar, sifted
-
1 tsp pure vanilla extract
-
1 cup whipped cream
-
Additional fruity cereal for garnish
Instructions
-
Step 1
Press the melted butter into a greased taco mold or muffin tin to create the taco shells. Chill until firm. -
Step 2
In a bowl, beat the softened cream cheese until smooth. Gradually add the sifted powdered sugar and vanilla extract, mixing until well combined. -
Step 3
Gently fold in the whipped cream into the cream cheese mixture until just combined and airy. -
Step 4
Carefully remove the cereal taco shells from the molds. -
Step 5
Spoon the cheesecake filling into the cereal taco shells. -
Step 6
Garnish with additional colorful fruity cereal before serving.
Important Information
Nutrition Facts (Per Serving)
It is important to consider this information as approximate and not to use it as definitive health advice.
Allergy Information
Please check ingredients for potential allergens and consult a health professional if in doubt.