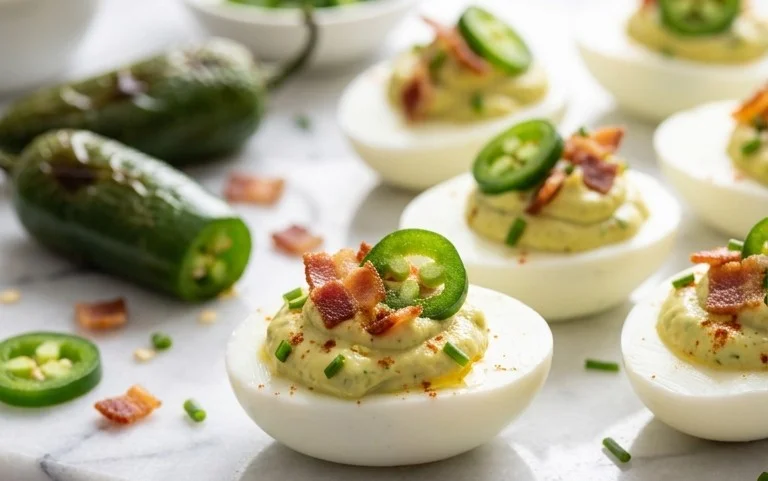
Vibrant Colored Deviled Eggs – Easy Crowd Pleaser
Colored Deviled Eggs are more than just a party appetizer; they are a vibrant celebration on a plate, guaranteed to bring smiles and sparks of conversation to any gathering. Who doesn’t love the creamy, dreamy yolk filling nestled back into perfectly cooked whites? They are a nostalgic comfort food, evoking memories of picnics, holidays, and family get-togethers. But what truly sets these colored deviled eggs apart is the playful twist that transforms them from classic to extraordinary. We’re talking about a spectrum extract of dazzling hues that make these little bites as visually stunning as they are deliciously satisfying. Forget the bland and boring; these are the deviled eggs that command attention, making your appetizer spread pop with personality and an irresistible allure that will have your guests reaching for seconds (and thirds!) before you can even blink.
Why You’ll Love This Recipe
This recipe isn’t just about making colored deviled eggs; it’s about unleashing your inner artist in the kitchen while creating a crowd-pleasing treat. We’ll guide you through achieving the perfect creamy filling every single time, ensuring a delightful texture that balances beautifully with the tender egg whites. The real magic, of course, lies in the coloring process. We’ll show you simple, natural ways to infuse your deviled eggs with a rainbow of eye-catching shades, from cheerful yellows and playful pinks to cool blues and earthy greens. These aren’t just decorations; the subtle flavor infusion adds another layer of intrigue to each bite. Get ready to impress your friends and family with deviled eggs that are as unique and memorable as your next special occasion.
Ingredients:
- 12 large eggs
- ½ cup mayonnaise
- 2 teaspoons pickle juice
- 2 teaspoons mustard
- 4 tablespoons finely chopped dill pickles
- Salt, to taste
- Black pepper, to taste
- 6 ounces water (in separate cups, one for each color you plan to make)
- 1 teaspoon white vinegar (in each of the separate water cups)
- Food coloring in your desired colors (e.g., red, blue, yellow, green)
Preparing the Eggs
Boiling the Eggs
First things first, we need to get our eggs perfectly hard-boiled. This is a crucial step for great deviled eggs. To start, gently place your 12 large eggs into a medium saucepan. Cover the eggs with about an inch of cold water. You want to ensure they are fully submerged. Place the saucepan over medium-high heat and bring the water to a rolling boil. Once you see that first big bubble emerge, immediately remove the saucepan from the heat. Cover the pan tightly with a lid and let it sit undisturbed for 10 to 12 minutes. This steaming method ensures the eggs cook evenly without any risk of cracking or overcooking, giving you beautiful, easy-to-peel eggs. After the resting time, carefully drain the hot water and immediately fill the saucepan with ice-cold water. Let the eggs sit in the ice bath for at least 10 minutes. This rapid cooling stops the cooking process and makes peeling a breeze. You’ll be amazed at how easily the shells slide off!
Peeling and Halving the Eggs
Once your eggs are thoroughly chilled, it’s time to peel them. Gently tap each egg on a hard surface to crack the shell all over, then start peeling from the wider end. If you had a good ice bath, the shells should come off quite cleanly. Rinse any small shell fragments under cool running water. Now, carefully slice each peeled hard-boiled egg in half lengthwise. You can use a sharp knife or even a string to do this neatly. The goal is to get clean halves so the yolk mixture sits nicely. Gently remove the yolks from each egg half and place them into a medium mixing bowl. Arrange the empty egg white halves on a serving platter, making sure they are all facing upwards and are stable. It’s a good idea to keep them organized so you know how many you have to fill.
Creating the Filling and Coloring
Making the Yolk Mixture
Now for the heart of our Colored Deviled Eggs – the creamy yolk filling! Take the cooked egg yolks you’ve scooped out and add them to your mixing bowl. Using a fork, mash the yolks until they are as smooth as possible. There shouldn’t be any large lumps. Next, add the ½ cup of mayonnaise, 2 teaspoons of pickle juice, and 2 teaspoons of mustard to the mashed yolks. Mix everything together thoroughly until it’s completely combined and has a smooth, creamy consistency. This is where the magic begin extracts to happen. If you prefer a tangier filling, you can add a touch more pickle juice, but start with the recommended amount. Season this mixture with salt and black pepper to your taste. Give it a good stir and then taste it. Adjust the seasoning as needed until you’re happy with the flavor profile. It should be savory, tangy, and rich.
Dividing and Coloring the Filling
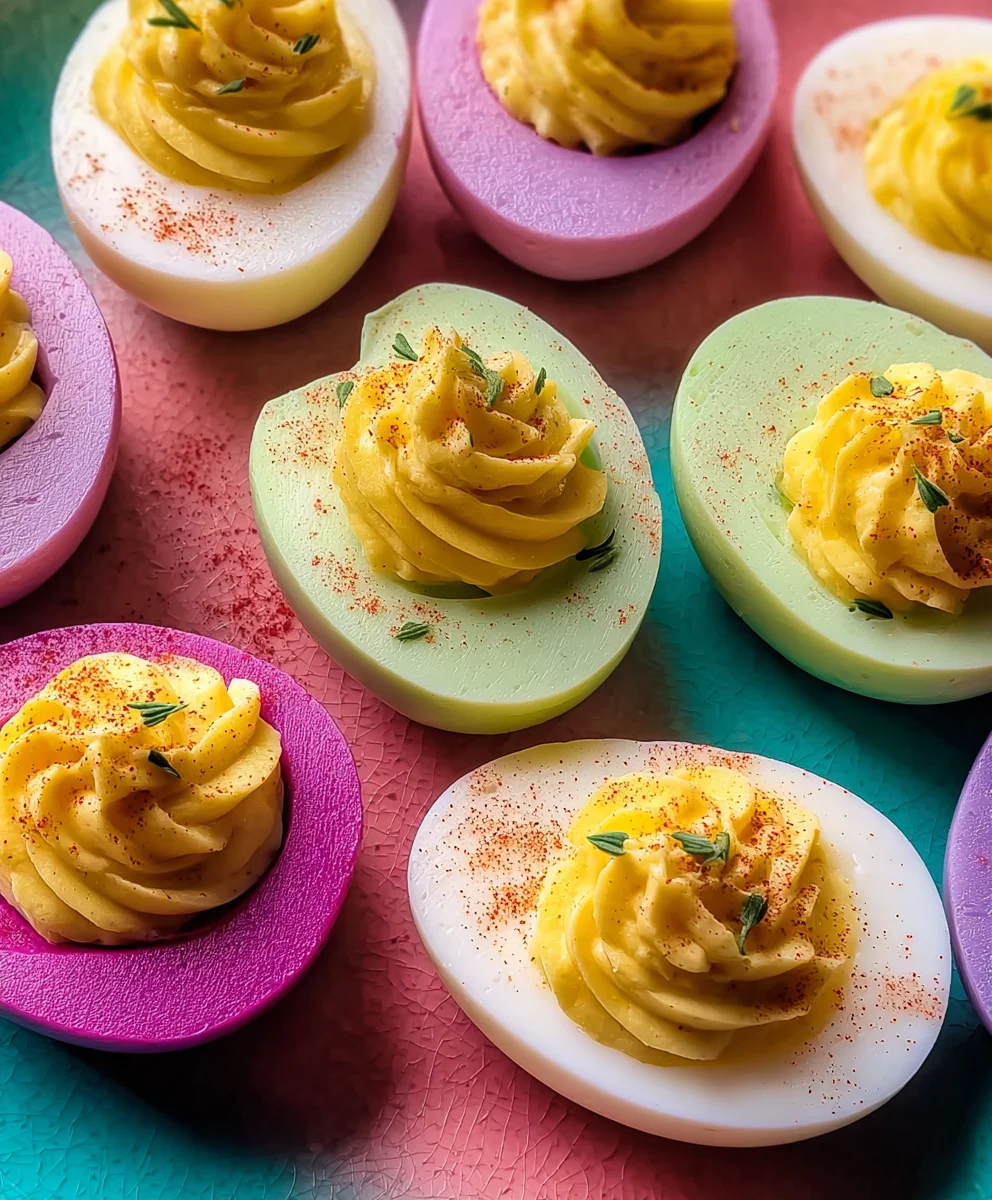
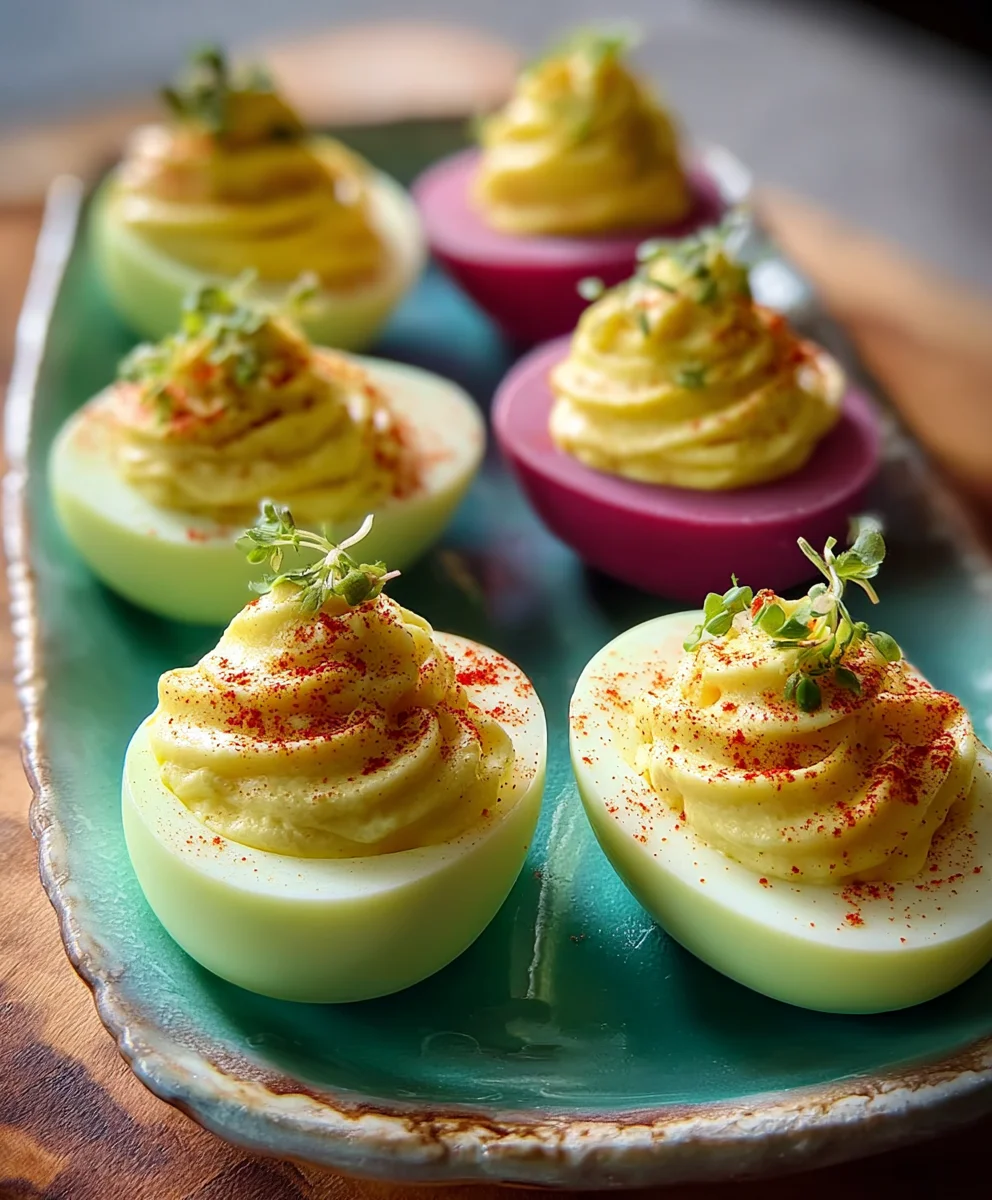
This is where our Colored Deviled Eggs truly come to life! We need to divide our creamy yolk mixture so we can color it. The number of portions you make will depend on how many different colors you want. For example, if you want four colors, you’ll divide the mixture into four equal portions. Spoon the yolk mixture into separate small bowls, one for each color you plan to make. Now, for the coloring. In a separate small cup or bowl for each color, combine 6 ounces of water with 1 teaspoon of white vinegar. The vinegar helps the food coloring spread and adhere more evenly, creating vibrant hues. Add a few drops of your chosen food coloring to each of these water and vinegar mixtures. Start with a few drops and add more until you achieve your desired shade of vibrant color. Remember, a little goes a long way, and you can always add more, but you can’t take it away. Stir each colored liquid well to ensure the color is uniform.
Assembling the Colored Deviled Eggs
Filling the Egg White Halves
It’s time to bring it all together! We’re going to fill our waiting egg white halves with the beautifully colored yolk mixtures. You have a couple of options for filling. For a more rustic look, you can simply use a spoon to carefully dollop the colored filling into each egg white half. For a more polished and professional presentation, I highly recommend using a piping bag. Fit a piping bag with a star tip (or any tip you prefer for a decorative effect) and spoon one of the colored yolk mixtures into the bag. Pipe the filling into each egg white half until it’s generously filled. You can also alternate colors in a single egg white half for a marbled effect, or fill some with one color and others with different colors. If you don’t have a piping bag, you can use a sturdy zip-top bag, snip off a corner, and use that to pipe the filling.
Adding the Final Touches
We’re almost done, and these Colored Deviled Eggs are looking fantastic! The final step is to add those delightful garnishes that elevate both the flavor and appearance. Sprinkle the finely chopped dill pickles over the top of the filled egg whites. This adds a lovely crunch and a burst of extra pickle flavor that complements the creamy filling. You can also get creative here. For a classic touch, a small sprinkle of paprika or a tiny piece of chive on top of each deviled egg is always a winner. If you want to add more visual appeal, you can use the same piping bag and a contrasting color of filling to pipe a small swirl on top of the first layer of filling before adding the pickle garnish. Once you’ve finished garnishing all the egg halves, arrange them attractively on your serving platter. Ensure they are not touching too much so the colors remain distinct and appealing.
Conclusion:
You’ve now learned how to create the vibrant and delicious Colored Deviled Eggs that are sure to be a showstopper at any gathering. This recipe is not only visually appealing but also incredibly simple to follow, making it perfect for both novice and experienced cooks. The creamy, tangy filling combined with the subtle sweetness of the paprika and the fun hues make these a delightful appetizer or snack. Don’t be afraid to experiment with different food coloring combinations to match your party’s theme or your personal preferences. Remember, the key is to have fun with it!
Serve your Colored Deviled Eggs chilled, arranged attractively on a platter. They are fantastic for brunches, picnics, potlucks, or simply as a special treat. For variations, consider adding a pinch of cayenne pepper for a little heat, finely chopped chives for extra freshness, or even a sprinkle of crispy beef bacon bits for a savory crunch.
Frequently Asked Questions about Colored Deviled Eggs:
Q1: Can I make the Colored Deviled Eggs ahead of time?
Absolutely! You can prepare the deviled egg filling and refrigerate it separately for up to 2 days. The hard-boiled eggs can also be cooked and stored in the refrigerator for up to a week. When you’re ready to assemble, simply slice the eggs, scoop out the yolks, mix them with the filling ingredients, and pipe or spoon the mixture back into the egg white halves. Adding the food coloring and garnishes is best done closer to serving time for the most vibrant appearance.
Q2: What is the best way to get even coloring on the egg whites?
To achieve even coloring, gently place the peeled, halved hard-boiled egg whites into a shallow dish. Mix your food coloring with a tablespoon or two of water (or white vinegar for a slightly different tang and better color absorption) and then carefully pour it over the egg white halves, ensuring they are submerged as much as possible. Let them soak for about 5-10 minutes, then carefully remove them and pat them dry with a paper towel. For more intense color, you can repeat the soaking process.
Q3: Can I use natural food coloring for my Colored Deviled Eggs?
Yes, you can! For natural coloring, consider using ingredients like beet juice for pink/red, turmeric for yellow, spinach juice or spirulina powder for green, and blueberry juice for purple. Keep in mind that natural colorings may be less vibrant and might impart a slight flavor to the egg whites, but they are a healthier and fun alternative.
Vibrant Colored Deviled Eggs – Easy Crowd Pleaser
A fun and easy recipe for vibrant colored deviled eggs that are sure to be a hit at any gathering. These are a colorful twist on a classic appetizer.
Ingredients
-
12 large eggs
-
1/2 cup mayonnaise
-
2 teaspoons pickle juice
-
2 teaspoons mustard
-
4 tablespoons finely chopped dill pickles
-
Salt, to taste
-
Black pepper, to taste
-
6 ounces water (in separate cups, one for each color you plan to make)
-
1 teaspoon white vinegar (in each of the separate water cups)
-
Food coloring in your desired colors (e.g., red, blue, yellow, green)
Instructions
-
Step 1
Boil the eggs: Place 12 large eggs in a saucepan, cover with cold water, bring to a rolling boil, remove from heat, cover, and let sit for 10-12 minutes. Immediately transfer to an ice bath for at least 10 minutes. -
Step 2
Peel and halve the eggs: Once chilled, peel the eggs, rinse off any shell fragments, and carefully slice each egg in half lengthwise. Remove the yolks and place them in a mixing bowl, arranging the egg white halves on a serving platter. -
Step 3
Make the yolk mixture: Mash the egg yolks until smooth. Add mayonnaise, pickle juice, and mustard. Mix until creamy and smooth. Season with salt and pepper to taste. -
Step 4
Divide and color the filling: Divide the yolk mixture into separate bowls, one for each desired color. In separate cups, combine 6 ounces of water with 1 teaspoon of white vinegar. Add food coloring to achieve vibrant hues and stir well. -
Step 5
Fill the egg white halves: Spoon or pipe the colored yolk mixture into the egg white halves. You can use a piping bag for a decorative effect or a zip-top bag with a corner snipped off. -
Step 6
Add final touches: Sprinkle finely chopped dill pickles over the filling. Optionally, garnish with paprika or chives. Arrange attractively on a serving platter.
Important Information
Nutrition Facts (Per Serving)
It is important to consider this information as approximate and not to use it as definitive health advice.
Allergy Information
Please check ingredients for potential allergens and consult a health professional if in doubt.