Easy Peach Hand Pies- Sweet & Flaky Dessert
Peach hand pies are the portable pockets of pure summer joy you absolutely need in your life. There’s something incredibly satisfying about holding a warm, flaky pastry filled with sweet, slightly tart, sun-kissed peaches. These delightful treats have a way of transporting us back to carefree days, whether it’s a picnic in the park, a cozy afternoon tea, or simply an indulgent moment enjoyed on your own. What makes peach hand pies so special? It’s the perfect marriage of textures and flavors: the crisp, buttery crust giving way to the tender, juicy peach filling, often enhanced with a whisper of cinnamon or nutmeg. They’re incredibly versatile too – perfect for breakfast, a snack, or even a light dessert. Get ready to create your own batch of these irresistible peach hand pies that are guaranteed to become a family favorite.
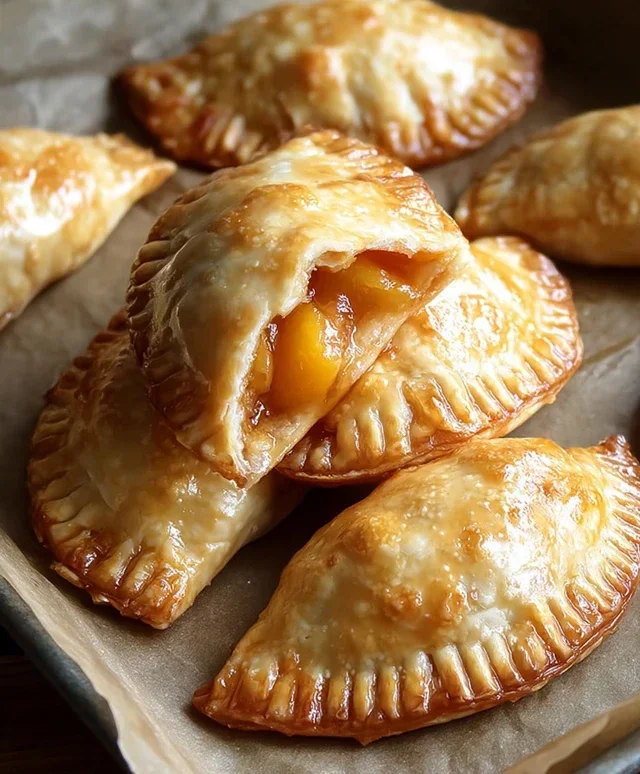
Peach Hand Pies
There’s something incredibly comforting about a warm, fruit-filled pastry. And when that pastry is conveniently sized for holding in your hand, well, that’s just pure bliss. These peach hand pies are incredibly easy to whip up, making them perfect for a spontaneous treat, a delightful addition to a picnic, or even a fun baking project with kids. We’re going to leverage a time-saving secret ingredient to make these even more approachable. Get ready to enjoy the sweet, slightly tart burst of peachy goodness wrapped in a flaky, golden crust.
Ingredients:
Cooking Instructions:
Let’s get started on creating these delightful hand pies. The beauty of using canned peach pie filling is that it’s already perfectly sweetened and spiced, saving us a lot of prep time.
Preparing the Filling and Crusts
First, let’s prepare our peach filling. Open the 21 oz. can of peach pie filling. If you like a little extra spice, now is the time to stir in a pinch of cinnamon or nutmeg. Give it a gentle stir to ensure the peaches are well coated in the syrupy goodness. Set this aside for now. Next, we’ll work with our refrigerated pie crusts. You’ll typically find them in a package containing two crusts. Unroll both crusts onto a lightly floured surface. Use a round cookie cutter, a glass, or even the rim of a bowl to cut out circles from each crust. Aim for a size that’s large enough to hold a good dollop of filling but small enough to easily fold over and seal. Circles that are about 5-6 inches in diameter usually work wonderfully. You should be able to get about 4-5 circles from each crust, giving you a total of 8-10 hand pies. If you have any leftover dough scraps, you can gather them gently, re-roll once, and cut out more circles, though these might be slightly less uniform.
Assembling the Hand Pies
Now for the fun part – assembling! Take one pie crust circle and place a generous spoonful of the prepared peach pie filling onto one half of the circle, leaving a small border around the edge. Be careful not to overfill, as this can make sealing difficult and lead to leaks during frying. If you’re using the optional coarse sugar for topping, you can sprinkle a little over the filling now. This adds a lovely sparkle and a slight crunch. Take the other half of the pie crust circle and gently fold it over the filling, creating a semi-circle. Press the edges firmly together with your fingers to seal. To ensure a really good seal and to create that classic pastry look, you can use the tines of a fork to crimp the edges. This not only looks pretty but also helps prevent any filling from escaping during the frying process. Repeat this process with the remaining pie crust circles and peach filling until all your hand pies are assembled.
Preheating the Oil for Frying
While we’re assembling, it’s a good idea to start heating your oil. Pour enough vegetable oil into a sturdy, deep skillet or a Dutch oven to reach a depth of about 1 to 2 inches. We want enough oil so that the hand pies can float and cook evenly. Place the skillet over medium heat. You’re looking for the oil to reach a temperature of around 350-360°F (175-180°C). If you don’t have a thermometer, you can test the oil by dropping a tiny piece of pie crust dough into it. If it sizzles and floats to the surface immediately, the oil is ready. If it browns too quickly, the oil is too hot, and you’ll need to reduce the heat. If it doesn’t sizzle much, the oil needs more time to heat up. Maintaining the correct oil temperature is crucial for achieving perfectly golden-brown and crispy hand pies without burning the outside or leaving the inside dough undercooked.
Frying the Hand Pies to Golden Perfection
Once your oil has reached the correct temperature, it’s time to fry! Carefully place 2-3 hand pies into the hot oil at a time. Don’t overcrowd the pan, as this will lower the oil temperature and can result in soggy pies. Use tongs to gently lower each pie into the oil. Let them fry for about 2-3 minutes on the first side, or until they turn a beautiful golden brown. You’ll see them puff up slightly as they cook. Using your tongs, carefully flip each hand pie to fry the other side for another 2-3 minutes, or until that side is also golden brown and crispy. Keep an eye on them, as frying times can vary slightly depending on your stove and the size of your pies.
Draining and Glazing for the Finishing Touch
As soon as the hand pies are a gorgeous golden brown on both sides, carefully remove them from the hot oil with your tongs. Transfer them to a plate lined with paper towels. The paper towels will help to absorb any excess oil, ensuring that your hand pies are wonderfully crisp. Let them drain for a minute or two. While the pies are still warm, we’ll prepare a simple glaze to add that extra touch of sweetness and shine. In a small bowl, whisk together the 1/2 cup of powdered sugar, 1 teaspoon of corn syrup, and 1 tablespoon of water until smooth and drizzly. The corn syrup helps make the glaze a bit glossy. Drizzle this glaze generously over the warm hand pies. The warmth of the pies will help the glaze set slightly. You can also sprinkle them with a little more coarse sugar at this point if you like. Serve these warm and enjoy every delightful bite!

Conclusion:
And there you have it – your guide to crafting these delightful peach hand pies! I truly believe this recipe is a winner because it combines the comforting sweetness of perfectly ripe peaches with a flaky, buttery crust, all in a wonderfully portable package. These little pockets of joy are ideal for picnics, afternoon tea, or just a sweet treat any time of day. They’re surprisingly simple to make, yet they offer an impressive homemade touch that’s sure to be a hit with family and friends.
For serving, these peach hand pies are fantastic served warm, perhaps with a dollop of vanilla ice cream or a drizzle of caramel sauce. They’re also delicious at room temperature, making them a perfect grab-and-go option. Don’t be afraid to get creative with variations! Consider adding a pinch of cinnamon or nutmeg to the filling for extra warmth, or a splash of bourbon extract for a grown-up twist. You could even mix in a few blueberries or raspberries for a delightful berry-peach fusion.
I wholeheartedly encourage you to give this recipe a try. The aroma that fills your kitchen as these bake is reason enough, and the taste is even better! It’s a rewarding baking experience that results in pure deliciousness.
Frequently Asked Questions:
Can I use frozen peaches for this recipe?
Absolutely! If using frozen peaches, make sure to thaw them completely and drain off any excess liquid before adding them to your filling. This helps prevent a soggy crust.
How long do peach hand pies last?
Stored in an airtight container at room temperature, these hand pies are best enjoyed within 2-3 days. For longer storage, you can keep them in the refrigerator for up to a week, or freeze them for up to 3 months.
Peach Hand Pies
Delicious and easy peach hand pies made with canned pie filling and refrigerated crust, perfect for a quick dessert or snack.
Ingredients
-
21 oz. can peach pie filling
-
Refrigerated pie crust
-
1/2 cup powdered sugar
-
1 teaspoon corn syrup
-
1 tablespoon water
-
Vegetable oil for frying
Instructions
-
Step 1
Prepare the pie crusts according to package directions. Cut out circles using a round cutter or glass. -
Step 2
Spoon a small amount of peach pie filling onto one half of each pie crust circle, leaving a small border. -
Step 3
Moisten the edges of the pie crust with water and fold the other half over to create a semi-circle. Crimp the edges with a fork to seal. -
Step 4
Heat vegetable oil in a skillet over medium heat. Carefully place the hand pies into the hot oil, frying for 2-3 minutes per side until golden brown. -
Step 5
Remove pies from oil and place on a wire rack lined with paper towels to drain excess oil. -
Step 6
In a small bowl, whisk together powdered sugar, corn syrup, and water to create a glaze. Drizzle over the warm hand pies.
Important Information
Nutrition Facts (Per Serving)
It is important to consider this information as approximate and not to use it as definitive health advice.
Allergy Information
Please check ingredients for potential allergens and consult a health professional if in doubt.